Express Js is one of the most popular Node.js frameworks. In this Node.js Express tutorial, we will build a mock landing page that can collect the email addresses of people interested to be notified of the launch of our imaginary podcast about headphones. Let’s get started.
Table of contents #
- What we are building
- Prerequisites
- Setup project
- Install express and pug
- Add the views
- Add the server and routes
- Testing
- Next steps
- TLDR; need a quick run
- Conclusion
What we are building #
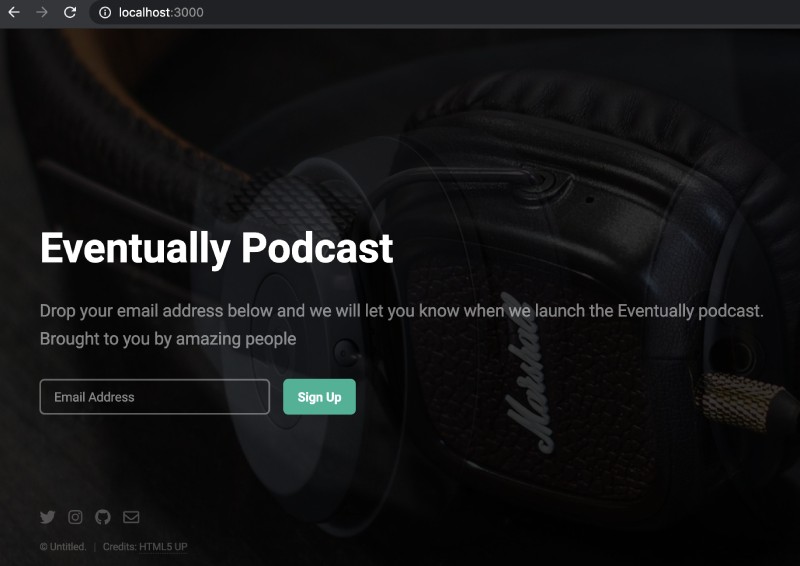
For this guide, we are building a simple one-pager landing page for an imaginary podcast about headphones. The website is called “Eventually podcast”. It is going to look something like below:

We will be converting a very useful and popular responsive HTML template called Eventually by HTML5UP. Thanks to the amazing creator AJ for providing such outstanding templates for free.
We will download the responsive theme which will have HTML, JS, and CSS files and we will transform the HTML file into a rudimentary template for this Node.js Express tutorial using Pug as the templating engine. To keep the scope of this step-by-step tutorial small, we will not deal with handling the form submission part.
Prerequisites #
Before we begin diving into the code, below are some nice to have prerequisites:
- You are generally aware of how Node.js and JavaScript works.
- Familiarity with NPM and installing NPM modules, so having npm and Node.js running locally is expected.
- Working with Git is a known concept for you. It will be useful if you want to clone and test out the project.
- Knowledge of basic HTML will also be greatly helpful
- A general understanding of how Pug templating works will be necessary
Time to get our hands dirty with the code.
Setup project #
To begin, we will create an empty directory named eventually-podcast and setup NPM in it running the following commands:
mkdir eventually-podcast
cd eventually-podcast
npm init -y
After running npm init -y it should look like below:
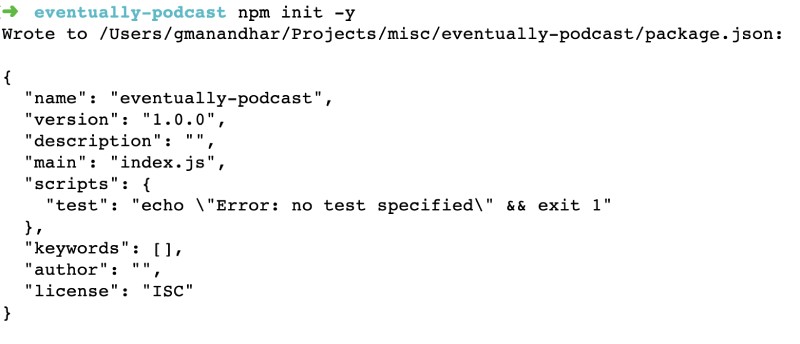
Great! We have our package.json in the folder. Next up we will install express js and pug.
Install express and pug #
We will need Express as our web application framework on top of Node.js and we will use Pug. To install both Express and pug we will run the command as below:
npm i --save express pugThis will add express and pug as dependencies in our package.json file.
Add the views #
At this point, we will download the Eventually template from HTML5UP. Then we can extract the zip file. It will have a folder structure and files like below:
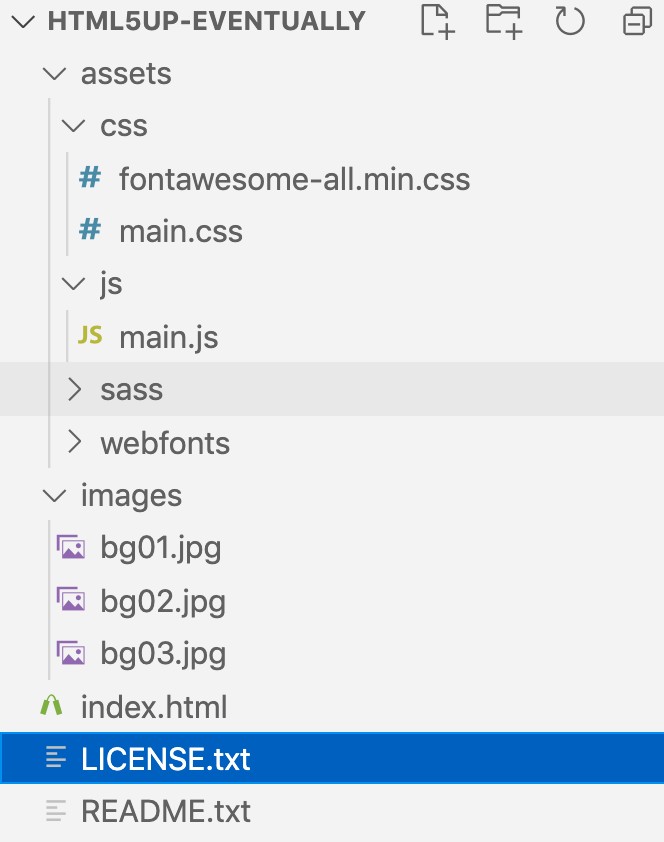
We will add 2 folders on the root level of our Express js project views and public with:
mkdir views
mkdir public
We will copy the assets and images folder from the html5up-eventually folder we got after unzipping the theme zip file and copy it into PROJECT_ROOT/public folder. For my example, I am using headphone images from Pixabay and Unsplash. You can either use what you like or just go with the default provided images.
If you want you can also add a favicon.ico file using a generator, I leave it up to you to add or not add a favicon.
After that, you can delete the saas folder inside the assets folder with:
rm -rf public/assets/sassWe will not be changing any of the CSS so we can safely delete the saas folder for the scope of this tutorial. Consequently, we will add 2 pug empty pug files in the views folder executing the following command:
touch views/layout.pug
touch views/index.pug
At this juncture your folder and file structure for the project will look similar to the following:
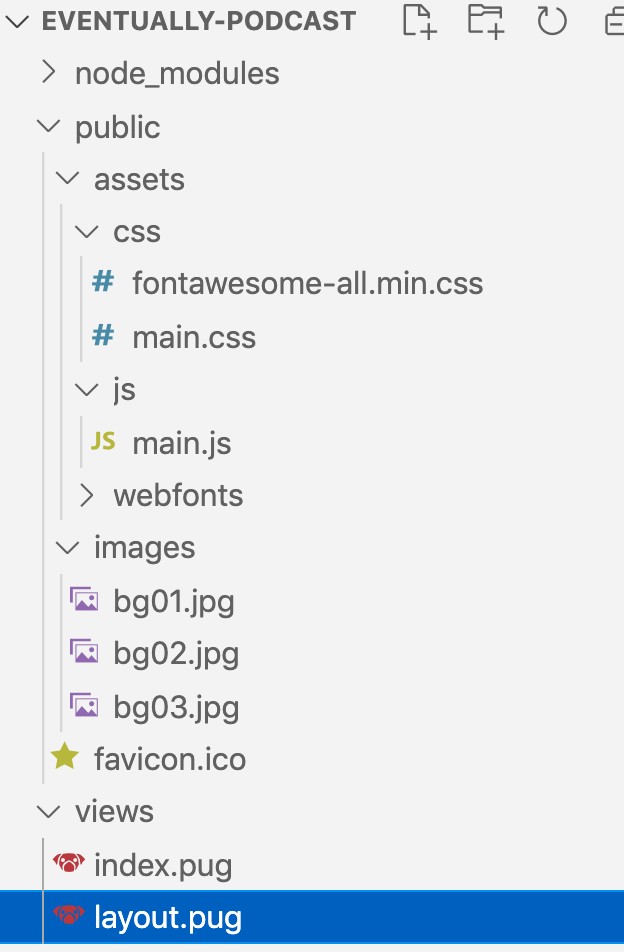
Of course, there will be package.json and package-lock.json as we have already installed Express and Pug in an earlier step. Subsequently, we will fill up the two Pug view files. I used HTML to Pug online tool to convert the HTML from the template to be Pug. Our layout.pug file should look like below:
doctype html
//
  Eventually by HTML5 UP
  html5up.net | @ajlkn
  Free for personal and commercial use under the CCA 3.0 license (html5up.net/license)
head
  title Eventually Podcast | #{title}
  meta(charset='utf-8')
  meta(name='viewport' content='width=device-width, initial-scale=1, user-scalable=no')
  link(rel='stylesheet' href='/assets/css/main.css')
body.is-preload
  block body-content
The two main things to notice here are, first, the body is a block content that can be extended and changed as per need. And the second thing is on line 7, #{title} will be filled up dynamically. Next up, our index.pug file will have the following contents:
extends layout

block body-content
  // Header
  header#header
    h1 #{mainText}
    p
      | !{subText}
  // Signup Form
  form#signup-form(method='post' action='#')
    input#email(type='email' name='email' placeholder='Email Address')
    input(type='submit' value='Sign Up')
  // Footer
  footer#footer
    ul.icons
      li
        a.icon.brands.fa-twitter(href='#')
          span.label Twitter
      li
        a.icon.brands.fa-instagram(href='#')
          span.label Instagram
      li
        a.icon.brands.fa-github(href='#')
          span.label GitHub
      li
        a.icon.fa-envelope(href='#')
          span.label Email
    ul.copyright
      li © Untitled.
      li
        | Credits:
        a(href='http://html5up.net') HTML5 UP
  // Scripts
  script(src='/assets/js/main.js')
As index.pug extends the layout this template will only fill up the body part. Even here there are two variables used #{mainText} and !{subText}. The ! in subtext denotes that it is unescaped but we know this string can be trusted as we are passing it ourselves from the server as we will see it in the next part. Generally, it is not advisable to use this as it can lead to unwanted code injection. In the next section, we will set up the server and the root route to render our templates.
Add the server and routes #
At this point, we have already put the Pug templates in place converting the HTML template into Pug syntax. Now, we will add the server and root route to glue it all together with our index.js file. The content of our /index.js file is as follows:
const express = require('express');
const path = require('path');

const app = express();
const port = process.env.PORT || '3000';

app.set('views', path.join(__dirname, 'views'));
app.set('view engine', 'pug');
app.use(express.static(path.join(__dirname, 'public')));

app.get('/', (req, res) => {
  res.render(
    'index',
    {
      title: 'Coming Soon!',
      mainText: 'Eventually Podcast',
      subText: `Drop your email address below and we will let you know when we launch the Eventually podcast.
      <br>Brought to you by amazing people`
    }
    );
});

app.listen(port, () => {
  console.log(`Listening to requests on http://localhost:${port}`);
});
Let’s evaluate what is happening in the above index.js file:
- Till line 5 we are instantiating a new express application which is our web server as well as the web application framework.
- On lines 7-8 we are telling express that we will use
pugas our views engine and views will be available in theviewsfolder - On line 9 we are routing all the static files in the
publicfolder to be available from the webserver as static files, for instanceBASE_URL/assets/css/main.csswill render our main CSS file. - At lines 11-21, we define our
/route which is a GET route. It renders theindexview passing needed variables like title, mainText, and subText. - Finally at line 23 we start the express server and it is listening to the port which will be 3000 if not passed as an environment variable called
PORT. If the environment variable is set that will take priority.
Testing #
To test the app, we can run node index.js, to make things easier we can add a npm start script that looks like below in the scripts section of the package.json file:
"start": "node index.js",Now we can run the app with either node index.js or npm start, which would yield and output as follows:

After that, we can check how the app looks at http://localhost:3000 on the browser of your choice. It should look something like below:
To make local testing easier we can surely add other helpful NPM packages like nodemon and browser sync. Those are good to have enhancements.
You can run this project in your browser with StackBlitz as seen below, click "Run Project" to get started (it runs fully in your browser, not hosted anywhere):
You can even fork it and change the code fully on your browsers and see the change reflected in the preview URL in a mattor of seconds.
Next steps #
This is just scratching the surface. If you want to change how the form submission behavior works you can look into the form submission part in the main.js file and change it to call an internal API or external route. All the code is available as an open source repository on Github for your convenience.
The application has a docker file if you want to quickly run it locally or deploy it to something like Google Cloud Run. You can dig more about Node.js and Docker if you want. I have also deployed the application on Qovery for quickly testing how it looks, if you want to deploy it yourself you can choose from any of the 3 free nodejs hosting services.
TLDR; need a quick run #
To run this app quickly, you can follow these steps given you have Node.js running locally:
- Git clone [email protected]:geshan/nodejs-express-tutorial.git
- cd
nodejs-express-tutorial - npm install
- npm start
- Navigate to
http://localhost:3000on your browser to see the output as follows.

Conclusion #
We just had a look at a simple but useful single-page website using Node.js Express and Pug to create it. I hope this step-by-step tutorial acts as a good starting point for you to build something interesting using Node.js and Express. Keep building!
