Deno is a relatively new runtime environment for JavaScript and TypeScript that has gained some attention in recent years. Docker is the leader in the container world and is the defacto tool for building, shipping, and running applications in containers. In this post, you will learn how to run a basic Deno application with Docker and Docker Compose. Let’s dive in!

Deno and Why Use It #
Deno is a modern JavaScript and TypeScript runtime created by Ryan Dahl, the original creator of Node.js. It's designed to address some of the issues and limitations found in Node.js. In his own words:
Deno is JavaScript for professional software engineers. Simple, secure, optimal.
You can watch the full talk below:
The official Deno website also talk about Node.js’ complexity. In the next section you wil learn about why use Deno.
Why use Deno #
There are many reasons to use Deno. It is faster and more secure, uses TypeScript
by default and is built to be more modular.
Faster and More Secure #
Deno is faster and more secure than Node.js because it uses a secure-by-default model.
In Node.js, scripts can access the file system, network, and environment variables by
default. This can lead to security vulnerabilities if a script is malicious. In Deno,
scripts must explicitly be granted permission to access these resources. This makes
Deno more secure by default. A blog post comparing Deno and Node’s performance concludes Node.js’s file serving seems slower compared to Deno. Also, Node.js uses more CPU and memory.
Uses TypeScript by Default #
Deno has built-in support for TypeScript, a typed superset of Javascript. This means you can write type-safe code in Deno without needing to install any additional tools.
TypeScript can help you catch errors early in the development process and make your code more maintainable. Deno still converts TypeSciprt to JavaScript for executing it.
Built to be More Modular #
Deno is designed to be more modular than Node.js, with a focus on using ES modules. ES modules are a modern JavaScript module system that is more standardized and easier to use than the CommonJS module system used by Node.js. Apparently, you can create a blog with 2 lines of code.
There are other reasons to use Deno too like it has a dependency inspector with deno info and built-in code formatter with deno fmt. In the next section, you will dive into using Deno with Docker.
Deno Docker Example #
Let’s jump to the practical part now, we will use a simple Deno Fresh application to see how we can dockerize it. I have already created a basic Deno fresh app and open-sourced it on GitHub.
Before getting into the technical details, let’s talk about what Deno fresh is. The official website of Deno Fresh has a tagline saying “The simple, approachable, productive web framework. The framework so simple, you already know it”.
The official docs further state:
Fresh is a full stack modern web framework for JavaScript and TypeScript developers, designed to make it trivial to create high-quality, performant, and personalized web applications.
For this Deno and Docker example, I wanted to give an example that can be built into an app rather than just a simple web server on Deno. Fresh is the Express equivalent of Deno with batteries included. Now let’s get your hands dirty with some code.
Step 1: Install Deno #
To install Deno follow the official installation guide. For my machine I ran:
curl -fsSL https://deno.land/install.sh | shThen to test it out, I executed deno –version which resulted in (at the time of writing this blog post):
deno 1.44.4 (release, aarch64-apple-darwin)
v8 12.6.228.9
typescript 5.4.5
Step 2: Set up Fresh #
Now to install a new copy for fresh, you can run:
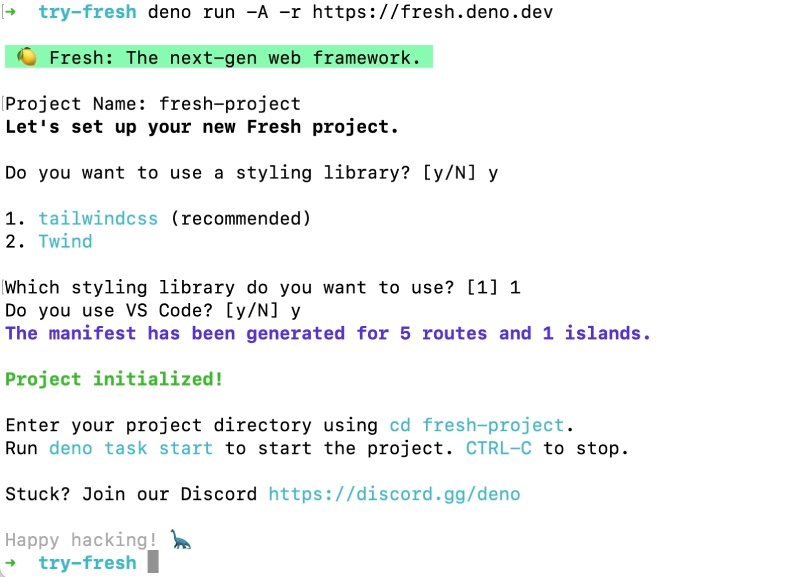
deno run -A -r https://fresh.deno.devIt will download somethings and then ask you give a name for the project, you can go with fresh-project as the default name. Then you can select, tailwind option 1 as your styling library. After that you can select to use or not use VS Code. I selected y as seen below:

To run a fresh Demo Fresh project you can then execute:
cd fresh-project
deno task start
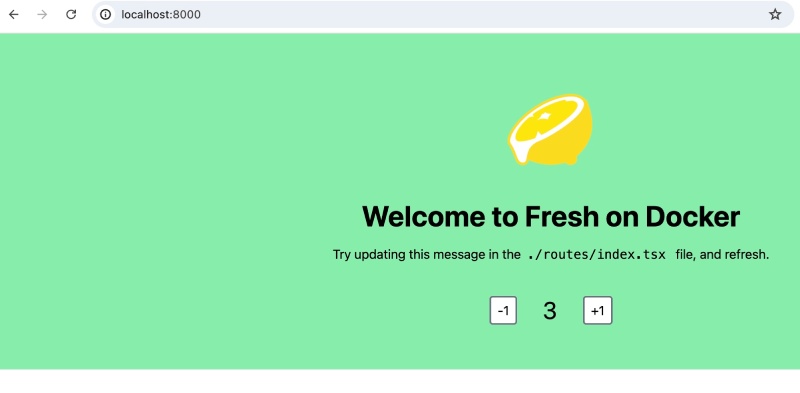
This will start your app at http://localhost:8000, if you go to that URL on your browser you will see:

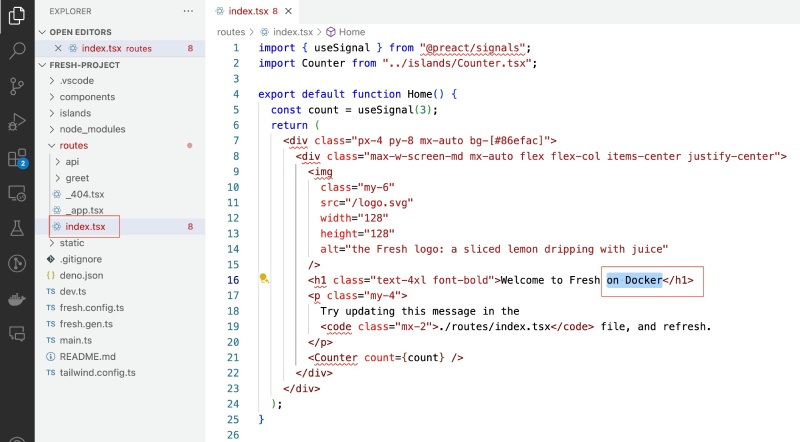
Stop the server and you can make a small change on the default Fresh install. On the editor/IDE of your choice open the fresh-project folder and edit the /routes/index.tsx file as follows:

Add on Docker at line 16 of the /routes/index.tsx file and save it. Then run the server again with deno task start and it will show up on your browser at http://localhost:8000. It will look like the below:

In the next step, you will Dockerize the Deno Fresh app.
Step 3: Dockerize Deno Fresh #
To Dockerize your Deno Fresh you will add a file called Dockerfle at the root of the project with the following contents:
FROM denoland/deno:alpine-1.44.4

WORKDIR /app

COPY . .
RUN deno cache main.ts
RUN deno task build

USER deno
EXPOSE 8000

CMD ["run", "-A", "main.ts"]
This Dockerfile is used to create a Docker container for a Deno application. Here's a breakdown of its contents:
FROM denoland/deno:alpine-1.44.4: This line specifies the base image for the container. It uses the Deno image based on Alpine Linux, version 1.44.4. Alpine Linux is chosen for its small size and security.WORKDIR /app: Sets the working directory inside the container to/app. All subsequent commands will be run from this directory.COPY . .: Copies all files from the current directory on the host machine to the current working directory (/app) inside the container.RUN deno cache main.ts: Caches the dependencies of themain.tsfile. Deno downloads and compiles dependencies ahead of time, and this command ensures that all dependencies are cached in the image, reducing the startup time of the container.RUN deno task build: Runs thebuildtask for Fresh that will create a _fresh folder which holds all the generated assets.USER deno: Switches the user context todeno. This is for security reasons, to not run the application as the root user.EXPOSE 8000: Informs Docker that the container listens on port 8000 at runtime. This does not actually publish the port; it functions as a form of documentation between the person who builds the image and the person who runs the container.CMD ["run", "-A", "main.ts"]: Specifies the default command to run when the container starts. In this case, it runs the Deno application with the commanddeno run -A main.ts. The-Aflag gives the script all permissions, which include network access, file system access, etc.
This Dockerfile is a straightforward way to containerize a Deno application, ensuring it runs in a lightweight, secure environment with all its dependencies properly cached. You can also use multi-stage docker build to reduce the size of the final image, but for this example, a single-stage build is sufficient. If you want a refersher on Docker, please do read this docker for beginners guide.
Given you have creaded the Dockerfile you can build it into a Docker image with:
docker build -t my-fresh-app .It will result in something as follows (I am using Docker version 24.0.2, build cb74dfc on a Mac):

To run Deno Fresh on a Docker container you can execute:
docker run -p 8000:8000 my-fresh-appIt will result in:

If you hit http://localhost:8000 you will see the Fresh page with Welcome to Fresh on Docker.
Step 3: Docker compose with Deno #
In this part, you will add a new docker-compose.yaml file in the root of the folder with the following contents:
version: '3.8'
services:
  app:
    container_name: deno_fresh_app
    build: .
    ports:
      - "8000:8000"
    volumes:
      - .:/app
    command: deno run -A main.ts
To run your Fresh app with Docker Compose you can run docker compose build which will build the image.

Then run docker compose up to run the app container. It will give an output like the following one:

Due to how things are cached, you might need to run deno task build locally to get the _fresh folder to be mapped with volumes for Docker compose. If you want a nodemon like experience you can use denon. If you want to learn more about Docker comoose you can check this docker compose tutorial.
All of the code is in this open-source GitHub repository. You can clone it and try it out yourself. If you have any questions or suggestions, feel free to open an issue or a pull request.
Conclusion #
Congratulations! You've successfully created a Deno Fresh application, containerized it with Docker, and managed it with Docker Compose. This guide has provided you with the foundational skills to work with Deno and Docker, and you're now equipped to build and deploy scalable applications. Keep Docerkizing!
