Two or more NPM commands can be run simultaneously with the NPM concurrently package. A simple use case for this can be when you want to run the server and the client in parallel for a JavaScript project. In this post, you will learn how to use the concurrently NPM package for running two or more NPM commands simultaneously, let's get going!

Table of contents #
- Prerequisites
- Example application - Weather with Geolocation
- Developing locally
- NPM concurrently
- Other options
Prerequisites #
Before you dive deeper into the details of the NPM concurrently package, it would be best to know the following
- Any prior knowledge of NPM and Node.js ecosystem will be helpful
- Latest Node.js LTS version running on your machine
- Prior experience with React.js will be beneficial but not required
- Any experience with Cloudflare pages and Cloudflare pages function (or Cloudflare Workers) would be highly beneficial
- Having a Cloudflare account (free) and the Wrangler CLI installed and working locally would help you follow along with the code examples
- With an API Ninjas account you will also be able to use their Weather API
Given the general requirements that have been mentioned for you, now is the time to jump into what the npm concurrently package will be used for.
Example application - Weather with Geolocation #
For this guide, you will be using an example React.js application generated with Create React App (CRA) that will be deployed to Cloudflare pages. The reason to choose Cloudflare pages is that it has the Cloudflare pages function which is an adapted version of Cloudflare workers. Given Cloudflare already has data centers in 275 cities in 100+ countries it fits the use case of this application very well.
The example React.js application in the context of this tutorial is a simple weather application that will show the city you are requesting the application form. The application will not ask for you to input the city you are located in. It will use Cloudflare’s Geolocaiton data available as part of the request to guess the city. If the city cannot be determined it will try to use the latitude and longitude to fetch the weather, mainly temperature. You will also use the wrangler CLI to test the application locally and deploy the application to Cloudflare pages.
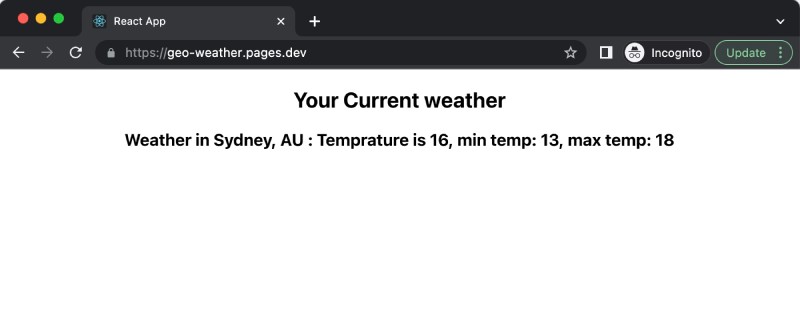
For the Weather API, you will be using API Ninjas’ Weather API which can work with either city or latitude and longitude. The application looks as follows:

You just hit the URL and with Cloudflare provided city or latitude and longitude the weather API will be called automatically and you will know your current temperature. There is no need to input your city.
For your reference, the codebase is available on GitHub. You can also look at the list of pull request to know how the app has been built. It is available for you to try out on Cloudflare pages. Hopefully, it will guess your city correctly or a city near by :).
If you are looking for an easier Express.js and React.js example, this video and code example by Traversy Media would be helpful. NPM concurrently is used to run the backend and the frontend with the single command. In the next section, you will learn about how the application is developed locally.
Developing locally #
To develop this application locally, you will use the wrangler CLI. The native React.js start script will not be used as the server (Cloudflare pages function) will be run with wrangler CLI and testing the React.js application will be done against the build folder.
Before using the NPM concurrently package, the following two commands were run in two different CLI tabs:
Run CRA build on file change #
The first command to run the react build step each time a file changes:
./node_modules/run-when-changed/bin/run-when-changed.js --watch "src/*.js" --exec "npm run build"The above command translates to the following NPM script:
"build:watch": "run-when-changed --watch 'src/*.js' --exec 'npm run build'",The requirement is to re-run the build (not use npm start) for the dev server. There is an issue on GitHub CRA repository to do this. A simple solution is to use the run-when-changed NPM package like above and get it done.
The reason you are not using the npm start command is that the /api/weather endpoint will not work for localhost:3000 dev server as it will not have the Cloudflare pages function. This function is the heart of this application that guesses the user’s city and pulls in the weather information. This command will build the react application with the Weather component that looks like the below:
import { useState, useEffect } from 'react';

const Weather = () => {
  const [weather, setWeather] = useState(null);
  const [loading, setLoading] = useState(true);
  const [error, setError] = useState(null);

  useEffect(() => {
    const fetchUsers = async () => {
      try {
        const data = await (await fetch('/api/weather')).json();
        setWeather(data);
        setError(null);
      } catch (err) {
        setError(err.message);
        setWeather(null);
      } finally {
        setLoading(false);
      }
    };
    fetchUsers();
  }, []);

  return (
    <div className="wrapper">
      <h2>Your Current weather</h2>
      {loading && <div>Your weather is loading...</div>}
      {error && <div>{`Problem fetching the weather data - ${error}`}</div>}
      <div className="stories-wrapper">
        {weather && weather.temp &&
          <div className='weather-desc'>
            <h3>Weather in {weather.fallback? 'unknown' : weather.city}, {weather.country} : Temprature is {weather.temp}, min temp: {weather.min_temp}, max temp: {weather.max_temp} </h3>
          </div>
        }
      </div>
    </div>
  );
};

export default Weather;
It is a simple React.js component that calls an API at /api/weather and sets the data as weather. It has some basic error handling. Then it renders the data of the API call to show the city, country, and temperature data like current, min, and maximum temperatures. In the consequent section, you will learn about the API that powers the weather front end.
Get Cloudflare pages function running locally #
The second command is used to run the Cloudflare pages function that fetches the weather by figuring out the user’s city from the Geolocation data. If you run just another server the Geolocation data will need to be mocked. To keep the development as close to production as possible you will run:
npx wrangler pages dev ./buildFor this to work, the build folder has to be available and wrangler CLI installed locally. The above command translates to an NPM script like:
"start:cf": "npx wrangler pages dev ./build"This command runs the React.js application on port 8788 by default with Miniflare. As Miniflare is a local simulation of Cloudflare workers (which powers Cloudflare pages function) you will get the Geo-location data needed for this example application to work.
The Cloudflare pages function that does the heavy lifting of guessing the city and calling the API Ninas’ API for weather information looks like the below:
export async function onRequestGet(context) {
  const {
    request, // same as existing Worker API
    env, // same as existing Worker API
    params, // if filename includes [id] or [[path]]
    waitUntil, // same as ctx.waitUntil in existing Worker API
    next, // used for middleware or to fetch assets
    data, // arbitrary space for passing data between middlewares
  } = context;

  const city = request.cf?.city || 'sydney';
  const fallback = !request.cf?.city;
  let url = `https://api.api-ninjas.com/v1/weather?city=${city.toLowerCase()}`;
  if (fallback && request.cf?.latitude) {
    url = `https://api.api-ninjas.com/v1/weather?lat=${request.cf.latitude}&lon=${request.cf.longitude}`;
  }
  const res = await fetch(url, {headers: {'X-Api-Key': env.API_NINJA_KEY}});
  const resData = await res.json();
  const response = {
    temp: resData.temp,
    feels_like: resData.feels_like,
    min_temp: resData.min_temp,
    max_temp: resData.max_temp,
    city,
    country: request.cf?.country || 'unknown',
    lat: request.cf?.latitude || 'unknown',
    log: request.cf?.longitude || 'unknown',
    colo: request.cf?.colo || 'unknown',
    tz: request.cf?.timezone || 'unknown',
    fallback
  };

  return new Response(JSON.stringify(response, null, 2));
}
Here the file is placed at /functions/api/weather.js which will equate to the route /api/weather on Cloudflare pages. On every GET request on that URI, the above function will be invoked.
This function pulls the data from Cloudfare’s Geo-location data available at reqeust.cf and gives first priority to the city name. If the city name is not found it takes the latitude and longitude from the request. Then depending on the data, it fetches the weather information from API Ninjas. To use API Ninjas’ API you need an API key. This API key is provided securely as an ENV variable.
After that, the function exposes only some of the values pulled in from API Ninjas’ Weather API. Now the problem here is when files change you have to check 2 CLI tabs to see if the changes are working fine. This is where the NPM concurrently package can run both the above commands simultaneously as a single NPM script, how? That is what you will find out next.
NPM concurrently #
You want to rebuild the React.js app on every file change and run the wrangler pages dev command as a single consolidated command. This is made possible by the concurrently NPM package. You can install concurrently with:
npm install --save-dev concurrentlyThe yarn variant will be yarn install concurrently. Then you can use concurrently in your package.json script. To run the build watch and wrangler page dev simultaneously, you will add:
## command to start dev server with build watch
"start:dev": "concurrently 'npm run build:watch' 'npm run start:cf'"
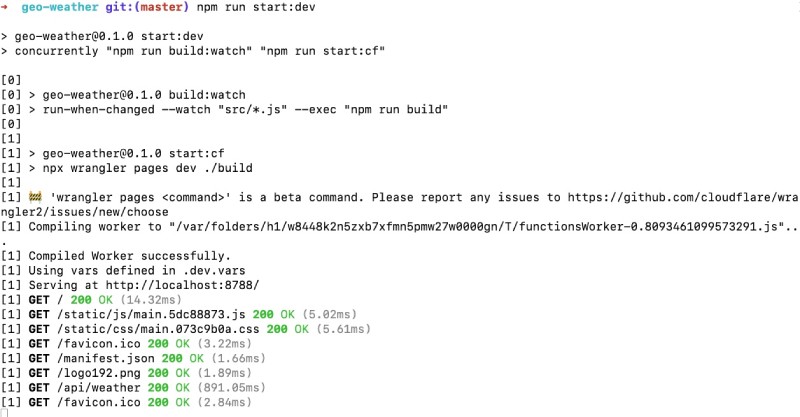
To package.json’s scirpts sections. Now to run both bulid:watch and start:cf simultaneously you can easily run npm run start:dev which will show something like:
npm run start:dev

> [email protected] start:dev
> concurrently 'npm run build:watch' 'npm run start:cf'

[0]
[0] > [email protected] build:watch
[0] > run-when-changed --watch "src/*.js" --exec "npm run build"
[0]
[1]
[1] > [email protected] start:cf
[1] > npx wrangler pages dev ./build
[1]
[1] 🚧 'wrangler pages <command>' is a beta command. Please report any issues to https://github.com/cloudflare/wrangler2/issues/new/choose
[1] Compiling worker to "/var/folders/h1/w8448k2n5zxb7xfmn5pmw27w0000gn/T/functionsWorker-0.8093461099573291.js"...
[1] Compiled Worker successfully.
[1] Using vars defined in .dev.vars
[1] Serving at http://localhost:8788/
[1] GET / 200 OK (14.32ms)
[1] GET /static/js/main.5dc88873.js 200 OK (5.02ms)
[1] GET /static/css/main.073c9b0a.css 200 OK (5.61ms)
[1] GET /favicon.ico 200 OK (3.22ms)
[1] GET /manifest.json 200 OK (1.66ms)
[1] GET /logo192.png 200 OK (1.89ms)
[1] GET /api/weather 200 OK (891.05ms)
[1] GET /favicon.ico 200 OK (2.84ms)
It looks like the following in your CLI:

This will also open a browser window at http://localhost:8788 and you can see the app running with the weather information of your current city. There are other CLI parameters in concurrently that might be good to know and use. For instance the -s or --success parameter can be useful to stop other commands if one fails.
In the next seciton, you will learn about other options to run commands simultaneously in addition to concurrently.
Other options #
Concurrently NPM package is a great option to run multiple commands or NPM scripts simultaneously. Still, it is not the only option as with many other things in the JavaScript ecosystem. You can try out npm run all or parallel shell as other alternatives. The main issue with these and other similar libraries is that they have not been updated for years. Whereas the last change in concurrently, at the time of writing this was done 11 days ago. To compare such packages you can use NPM Trends.
Conclusion #
You have learned how to use NPM concurrently package to run two (or more) commands simultaneously. In the process, you also learned about a simple yet useful React.js application to show weather information.
The main difference in this Weather app is it will guess the user’s city or latitude and longitude using the Geolocation data provided by Cloudflare.
Happy Coding!
