Imagine your console.log being able to show multiple colors. Not only would it be colorful but it will also be helpful. This is where the NPM chalk module comes in very handy. With the NPM chalk module, you can sprinkle multiple colors to your boring black-and-white console output and format the text.
It will add some life to your console by highlighting important text and making the text more readable. In this post, you will learn how to install and use the NPM chalk module to colorize your console output. Let’s get started!

Table of contents #
- What is NPM chalk?
- Popularity of Chalk
- Example CLI application
- How to install chalk to an existing app
- Adding chalk and formatting to CLI output
- Other NPM chalk options
- Conclusion
What is NPM chalk? #
NPM chalk is a third-party Node.js module that is used to add color and styling to text on the command-line output. It also allows creating your own themes for your Node.js project. As per the Chalk GitHub page, it is:
Terminal string styling done right
Chalk supports multiple text styles with backgrounds supporting different colors and formatting. For instance, you can show text in red color with a gray background that is bold and underlined. The chalk module is easy to install and use, depending on your terminal colors it can support a lot of colors.
It is an actively maintained project without any dependencies. Chalk also has an expressive API and it is a performant library. In the next part, you will know about the popularity of the NPM chalk module.
Popularity of Chalk #
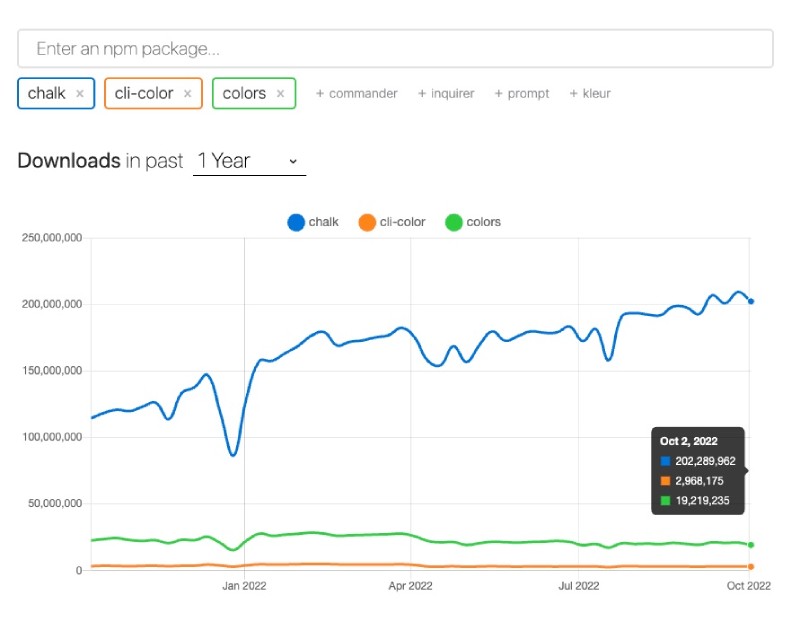
As mentioned in the Chalk modules’ GitHub page, it is used by ~86K packages, it also has 202 million downloads per month on NPM as of Oct-2022. A quick comparison of Chalk, colors, and the cli-color module on NPM Trends reveals that Chalk is very popular. It is 10 times more popular than the colors module and around 70 times more popular than the cli-color module.

In the next section, you will learn about a simple CLI application where you will add the NPM chalk module to it.
Example CLI application #
For a way to use the Chalk module in an existing app, you will use this simple app which uses Node.js readline functionality to take an input and how a basic output. You can clone this application from GitHub using git clone [email protected]:geshan/nodejs-readline.git and then install the chalk module as shown in the following part.
Bear in mind you will need Node.js 17+ to run this application.
At the time of writing the latest LTS version is Node.js 18 which is the recommended version to run this application.
To quickly test this application you can execute node readline.js which will ask the following question you can answer:
node readline.js
What is 4x4 equals? 16
16 is correct!
You will need to type an answer and the program will tell you if it is correct or not. Till now you will not see any color or formatting. In the next section, we will add the chalk module to the application to add that zing with colors and formatting.
How to install chalk to an existing app #
To install the NPM chalk module to an existing Node.js application you should run:
npm install –save chalkAt the time of writing, it will install chalk version 5.1.0`. One important thing to notice here is from version 5, chalk is ESM EcmaScript Module. This means if you want to use chalk with TypeScrpt or other build tools you will want to use Chalk version 4. Read more on version 5 and the pure ESM module.
Once you have installed chalk as an NPM module you can use it in the script to get the answer for 4x4 as detailed in the consequent section.
Adding chalk and formatting to CLI output #
To add the colors and formatting for the correct or incorrect answer for 4x4, you can edit the readline-basic.mjs file as follows:
import * as readline from 'node:readline/promises';
import { stdin as input, stdout as output } from 'node:process';
import chalk from 'chalk';

const rl = readline.createInterface({ input, output });
try {
  const answer = await rl.question('What is 4x4 equals? ');

  const correct = chalk.green.bgGray.underline.bold;
  const incorrect = chalk.red.bgWhite.bold;
  const isCorrect = answer.trim() === '16';
  const output = isCorrect ? correct(`${answer.trim()} is correct!`) : incorrect(`${answer.trim()} is incorrect. Try again.`);

  console.log(output);
} catch(err) {
  console.log(`Error: `, err);
} finally {
  rl.close();
}
process.exit(1);
First, you have imported the chalk NPM module on line 3. Then you have added a new style called correct as the correct constant. This constant will show green text on a gray background with bold and underlined text.
Similarly, you have also set an incorrect style which will show red text on a white background with bold formatting. Next, depending on whether the answer for 4x4 is correct or not if it is 16 or not the correct or incorrect style is applied then the colorized and formatted text is set in the output constant. Finally, the output is printed on the screen with console.log which will have the set colors and formatting.
When you run the script with the correct and incorrect answers it will yield the following output:

There are other convinient NPM chalk options you can use, those are discussed in the next section.
Other NPM chalk options #
There are other colors and formatting options you can use with NPM chalk. You can also set levels for the chalk NPM module to show the number of colors from none (0) to 16 million true color support (3). All the color options and background color options are also listed on the NPM chalk’s GitHub readme. Depending on the color support of the CLI even Hex and RGB colors can be used in the output.
You can also pass multiple parameters to chalk method calls like:
import chalk from 'chalk';

console.log(chalk.blue('This', 'is', 'a', 'long', 'sentence', 'in', 'blue', 'using', 'chalk'));
It will result in the following output when run with node long-sentence.mjs:

You can find all the code examples from this post in the pull request. Chalk is a very useful NPM module you can use for coloring and formatting the command line output.
Conclusion #
In this post, you have learned about the useful NPM chalk module. In addition to what is chalk and its popularity you also gained knowledge about how to install and use it in a Node.js application. You also found out about the other options available in the Chalk NPM module.
Keep making the CLI outputs not only colorful but well formatted too.
Happy Coding with Chalk!