React.js is undoubtedly one of the most popular front-end libraries. There are multiple ways to add multiple class names to a div in a React Component, using class names NPM package makes it very easy. In this post, you will learn how to use class names NPM package in a React.js application. Let’s get going!

Table of contents #
- Prerequisites
- Example app - Name to Nationalities guesser
- Task on hand - conditionally add a CSS class
- Add classes with simple string concat
- Add classes with Classnames
- Conclusion
Prerequisites #
Before you get your hands dirty with the code, below are some requisites:
- Prior experience with Git and GitHub will be necessary
- Any prior knowledge of React will be helpful
- A general understanding of how APIs work and are called from React.js would be needed.
Given those are mentioned, now you can learn about the example app that will be used in this guide, the app will guess the nationalities of a provided name as discussed next.
Example app - Name to Nationalities guesser #
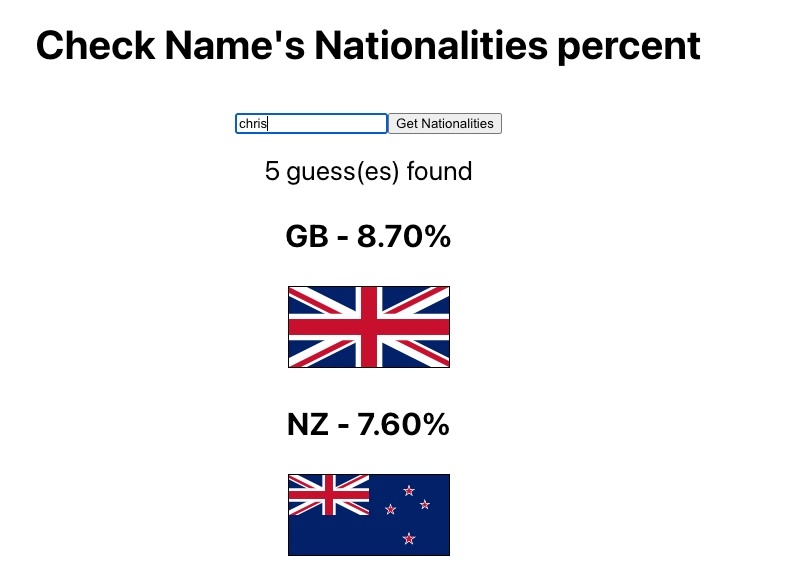
For the scope of this blog post, you will use an open-source app built with React.js. It is a simple yet useful app that will take in a name and guess the nationalities for that name by calling the Nationalize.io API. It will then render the guessed percentages with flags of the country calling another Flag Image API.
You can see the app in action below for the name chris:

The app’s code is open source on GitHub and you can see the app running without class names on Netlify. Notice that there are not styles on the text 5 guess(es) found.
Get the app running locally #
To run the app locally, you can clone the repository with the following command:
git clone -b before-classnames [email protected]:geshan/name-nationality.gitAfter that you can install the needed NPM dependencies by running npm install, then you can run the app with npm start. It will show up on the browser like below:

Great! Your Name guessing app is running you can play around with it.
Task on hand - conditionally add a CSS class #
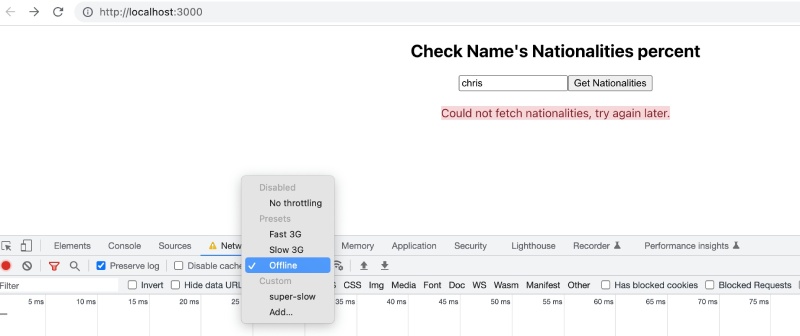
Now you can look at the code by opening the project in the IDE of your choice. The app calls the Nationalize API. As it is a third-party service so it can be down or too slow. Like any other HTTP request, there is no guarantee that it will work all the time. This is already handled in the code, in case of an error a message Could not fetch nationalities, try again later. is shown. The task is to add a success or error class to the div with the class message in the App.js main component.
For this, you can add the following CSS styles in the App.css files for the success and the error classes as follows:
.error {
  color: #842029;
  background-color: #f8d7da;
  border-color: #f5c2c7;
}

.success {
  color: #0f5132;
  background-color: #d1e7dd;
  border-color: #badbcc;
}
The CSS code is self-explanatory, if the error class is added, it will show a pink background and maroon text. For the success case, it displays a light green background with dark green text. In the next section, you will add the success and error class to the div that shows the message with simple string concatenation.
Add classes with simple string concat #
The task is straightforward if the API call is successful the div with the message class will have a success class appended to it, in case of any error the error class will be added after the message class.
This work can be done in multiple ways, one of those is to do it with a variable that will have an initial value of the string message. If the HTTP call to Nationalize API is successful you will append success to the variable. In case of an error is encountered while calling the API you will append error to the variable. This can be seen in the code below:
import { useState } from 'react';
import './App.css';

function App() {
  const [nationalities, setNationalities] = useState([]);
  const [message, setMessage] = useState('');
  const [personName, setPersonName] = useState('');
  const [messageClassNames, setMessageClassNames] = useState('');

  async function fetchNationalities() {
    let msgClassNames = 'message';
    try {
      const data = await (await fetch(`https://api.nationalize.io/?name=${personName}`)).json();
      const hasCountryData = data.country && data.country.length
      const nationalities =  hasCountryData ? data.country : [];
      setNationalities(nationalities);

      const message = hasCountryData ? `${data.country.length} guess(es) found` : 'No nationality match found';
      msgClassNames += ' success';
      setMessageClassNames(msgClassNames);
      setMessage(message);
    } catch (err) {
      console.log(`err: ${err.message}`);
      setNationalities([]);
      msgClassNames += ' error';
      setMessageClassNames(msgClassNames);
      setMessage('Could not fetch nationalities, try again later.');
    }
  }

  async function handleSubmit(e){
    e.preventDefault();
    await fetchNationalities();
  }

  return (
    <div className="App">
      <header className="App-header">
        <div className="title-form">
          <h2>Check Name's Nationalities percent</h2>
          <div style={{ marginBottom: '20px' }}>
            <form name="nationalities-form" onSubmit={handleSubmit}>
              <input
                name="personName"
                type="text"
                onChange={(e) => setPersonName(e.target.value)}
                value={personName}
                placeholder="Enter a person's name"
              />
              <button onClick={handleSubmit}>Get Nationalities</button>
            </form>
          </div>
        </div>
        <div className="results">
          <div className={messageClassNames}>{message}</div>
          <div className="nationalities">
            {Array.isArray(nationalities) && nationalities.map(
              nationality => {
                const flagUrl = `https://flagcdn.com/w160/${nationality.country_id.toLowerCase()}.jpg`;
                const altText = `${nationality.country_id} flag`;
                return <div key={nationality.country_id}><h3>{nationality.country_id} - {(nationality.probability * 100).toFixed(2)}%</h3> <img src={flagUrl} alt={altText} style={{
                  border: "1px solid black"
                }} /></div>
              }
            )}
          </div>
        </div>
      </header>
    </div>
  );
}

export default App;
The above App.js is a modified version of the same file before adding the logic to include the success and error classes to the div with the message class. The main changes in this version as highlighted above in yellow are:
- A state variable named
messageClassNamesis initialized on line 8 with an empty string. - On line no. 11, another variable named
msgClassNamesis initialized with the stringmessage. - Later on 19-20, as the API call is successful the string
successis added to themsgClassNamesand the value formessageClassNamesis updated with the value ofmsgClassNames. The variablemsgClassNamesat this stage has thesuccessappended to it. - In case of error, on lines 25-26, the
msgClassNamesvariable haserrorappended to it and is set to themessageClassNamesstate variable. - The final change is on line 55, where the
messagestring has been replaced with the{messageClassNames}which has the dynamic class names depending on the result of the API call.
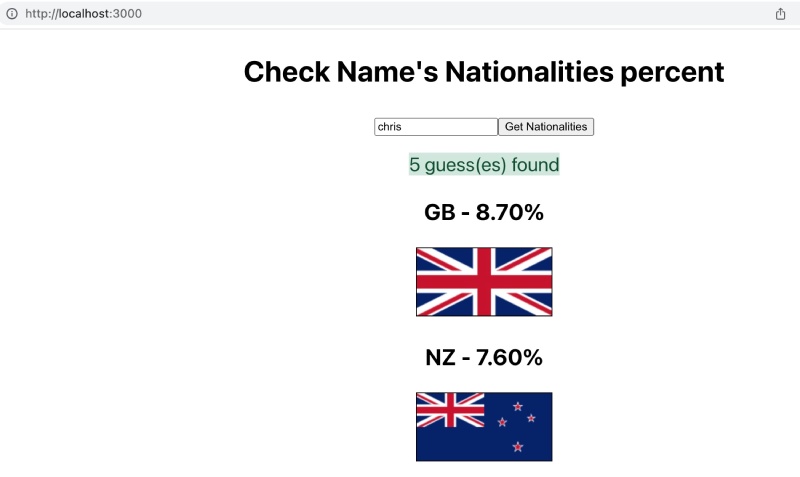
After this change, if you test the Name to nationalities guessing app with chirs it will look like the following:

Notice that the 5 guess(es) found text has the styling of the success class applied to it. To test the error scenario, on Chrome you can in the “dev tool” go to the “Network” tab and choose “Offline” and then try the request again it will fail. It will show an output like the one below:

You have seen an imperative way to add the success or error depending on the API’s response. Let’s suppose you had to add 3 more classes then managing the if/else logic will be overly complicated. This is where the glorified string concatenator NPM package classnames comes to save the day, as discussed next.
Add classes with Classnames #
As you have seen above, imperatively adding multiple class names in React with string concatenation is not easy. The code is convoluted and prone to errors if there are more than 2 classes to be added to the same HTML element. The solution to this issue is the Classnames NPM package.
Meet Classnames, A simple JavaScript utility for conditionally joining classNames together. If you term it a “smart” string concatenator you will not be wrong. Interestingly, the official React docs also mentions classnames in the “How to apply multiple CSS classes conditionally” section. In the next part, you will find out how to install the classnames package.
Install classnames #
To install the classnames package with NPM you can execute:
npm install –save classnamesThis will add the classnames NPM package to your React.js project. You can use it to dynamically and declaratively add multiple classes to the HTML elements of your React.js components.
Again, the task is simple, if the call to Nationalize.io API is fine add the success class. In case of any error add the error class to the div that already has the message class. You will see the code to do so, now using classnames in the next section.
Use class names #
The code below uses classnames (without other features like dedupe) to accomplish the above-mentioned task:
import { useState } from 'react';
import './App.css';
import classNames from 'classnames';

function App() {
  const [nationalities, setNationalities] = useState([]);
  const [message, setMessage] = useState('');
  const [personName, setPersonName] = useState('');
  const [messageClassNames, setMessageClassNames] = useState('');

  async function fetchNationalities() {
    let errorInFetch = false;
    try {
      const data = await (await fetch(`https://api.nationalize.io/?name=${personName}`)).json();
      const hasCountryData = data.country && data.country.length
      const nationalities =  hasCountryData ? data.country : [];
      setNationalities(nationalities);

      const message = hasCountryData ? `${data.country.length} guess(es) found` : 'No nationality match found';
      setMessage(message);
    } catch (err) {
      console.log(`err: ${err.message}`);
      errorInFetch = true;
      setNationalities([]);
      setMessage('Could not fetch nationalities, try again later.');
    }

    const msgClassNames = classNames({
      message: true,
      'success': !errorInFetch,
      'error': errorInFetch,
    });
    setMessageClassNames(msgClassNames);
  }

  async function handleSubmit(e){
    e.preventDefault();
    await fetchNationalities();
  }

  return (
    <div className="App">
      <header className="App-header">
        <div className="title-form">
          <h2>Check Name's Nationalities percent</h2>
          <div style={{ marginBottom: '20px' }}>
            <form name="nationalities-form" onSubmit={handleSubmit}>
              <input
                name="personName"
                type="text"
                onChange={(e) => setPersonName(e.target.value)}
                value={personName}
                placeholder="Enter a person's name"
              />
              <button onClick={handleSubmit}>Get Nationalities</button>
            </form>
          </div>
        </div>
        <div className="results">
          <div className={messageClassNames}>{message}</div>
          <div className="nationalities">
            {Array.isArray(nationalities) && nationalities.map(
              nationality => {
                const flagUrl = `https://flagcdn.com/w160/${nationality.country_id.toLowerCase()}.jpg`;
                const altText = `${nationality.country_id} flag`;
                return <div key={nationality.country_id}><h3>{nationality.country_id} - {(nationality.probability * 100).toFixed(2)}%</h3> <img src={flagUrl} alt={altText} style={{
                  border: "1px solid black"
                }} /></div>
              }
            )}
          </div>
        </div>
      </header>
    </div>
  );
}

export default App;
As seen above, the main code changes have been again highlighted in yellow. These changes are as follows:
- The
classnamesfunction is imported from theclassnamespackage on line no. 3 - On line 12, a new variable called
errorInFetchis introduced and initialized with the valuefalse. - After that, at line 23 in the catch section, the
errorInFetchvariable is set to true. So in case of the happy case of no errors from the API call to Nationalize.io, this variable will still stayfalse. - Then, in lines 28-32 the main usage can be seen, where the
classnamesfunction is called with an object which instructs to always add the class namemessagebut adding eithersuccessorerrorclassname depends on the value of theerrorInFetchvariable. - As the
messageClassNamesis already used for the class name of the div showing message it will pick up the new dynamic class names automatically.
For your reference, you can also view the above changes as a pull request. Running the code will give the same output as above when done imperatively with string concatenation. A better and easier way to show sucess/error messages with better UI can be with React Toastify, without the need to meddle with the class names.
Conclusion #
In this tutorial, you learned how to add multiple class names to an HTML element of a React.js component in two ways. The first way is a manual process that concatenates strings. This way is difficult as well as prone to error because it is imperative. The second way you learned to add multiple classes was by using the classnames NPM package. The second way was an easy, one-shot solution in a declarative approach. The second way is clear, concise, and less prone to errors.
I hope this guide has helped you easily add many class names to HTML elements of your React.js components.
