MongoDB is an open-source document database that is designed to scale and provide high availability. In this guide, you will learn how to run MongoDB with Docker and Docker Compose. Let's get going!

Table of contents #
- What is MongoDB?
- Why use MongoDB?
- Prerequisites
- Run MongoDB with Docker
- Run MongoDB with docker-compose
- Running MongoDB using docker-compose with a Node.js app
What is MongoDB? #
MongoDB is a NoSQL database that stores data in flexible, JSON-like documents. It is designed to scale horizontally across many commodity servers, providing high availability with automatic failover and data redundancy. MongoDB's query language is expressive and powerful, allowing developers to work with data naturally as you can store and retrieve JSON easily.
It has a community edition and an enterprise edition too. MongoDB also has a cloud offering called MongoDB Atlas.
Why use MongoDB? #
MongoDB is a popular choice for modern applications due to its flexibility and scalability. It can store structured and unstructured data, making it a good fit for applications with changing or unpredictable data requirements. Its document-based data model makes it easy to work with JSON data, which is widely used in web applications.
Additionally, MongoDB is designed to scale horizontally, allowing it to handle large amounts of data and traffic. With its flexible data model and easy-to-use interface, it has become a popular choice for modern applications.
Prerequisites #
To move further and dive deeper into the code, you will need the following:
- Any prior experience running or working with MongoDB will be helpful.
- You should have Docker and Docker compose running on the machine you want to execute the example app
- Previous experience working with Node.js and NPM CLI will be beneficial but not required.
- Knowing how to use Git and GitHub will be useful
Please keep in mind that the examples are run on a Mac and will run on a *nix system. No guarantees are made that the commands below will run fine on a Windows machine. Now it is time to move with the commands.
Run MongoDB with Docker #
For all the examples below, you are going to use the MongoDB 6-jammy docker tag which is version 6 of Mongo on the Ubuntu Jammy OS. To Run MongoDB 6 with docker you can execute the Docker run command which will pull the docker image if not locally available and run it. The command is given below:
docker run --rm --name mongo6-jammy -e MONGO_INITDB_ROOT_USERNAME=admin -e MONGO_INITDB_ROOT_PASSWORD=VRuAd2Nvmp4ELHh5 -e MONGO_INITDB_DATABASE=test -v /tmp/mongo-data:/data/db mongo:6-jammyYou have run the Docker run command with the --rm flag which will remove the container after it stops. The added –nameparameters add a name to the running container which you can see from the [docker ps](https://geshan.com.np/blog/2022/05/docker-commands/#docker-ps) command. After naming the containermongo6-jammyyou pass in 3 environment variables with the-eparameters. Those areMONGO_INITDB_ROOT_USERNAME,MONGO_INITDB_ROOT_PASSWORD, andMONGO_INITDB_DATABASEto specify the root username, password, and the database name respectively. After that you add the-vto include the volume in the running container, in the above example the local/tmp/mongo-datais mapped to/data/dbon the container. This is done to keep the data intact when the container restarts. Note here that as you are using/tmp` when the machine restarts data will be lost.
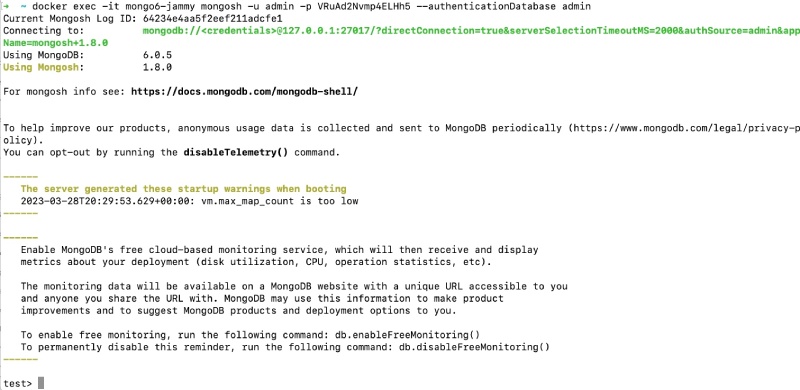
After the container is running with the name mongo6-jammy and waiting for connections as seen in the mange below.

You can execute other commands inside the running container. For now, you will execute the mongo shell, then insert a document, and retrieve it. First, you will run the mongo shell (mongosh) by executing the following command:
docker exec -it mongo6-jammy mongosh -u admin -p VRuAd2Nvmp4ELHh5 --authenticationDatabase admin
The MongoDB server is running and you have access to it with the mongo shell from inside the container. Now to insert a document by running the following commands in the Mongo shell:
db.tutorial.insertOne({title: "test tutorial", description: "description for test tutorial", published: false, createdAt: "2023-03-30T12:04:15.008Z", updatedAt: "2023-03-30T12:04:15.008Z" });The above command will insert a tutorial titled “test tutorial” and also have other attributes as seen above. When the command completes successfully it will give an output as below:

As you have inserted a document in the tutorial database. Now to find the inserted document you can run:
db.tutorial.find({title: "test tutorial"});That will result in the following where it finds the inserted document in the database

Hurray! You were able to run MongoDB with Docker and insert and view the inserted document. You also found out that running Mongo just using the Docker run command has multiple parameters you need to get right and it is not easy to remember all of those. This is where the power of making the process of running MongoDB declarative comes in. In the next section, you will learn how to run MongoDB with docker-compose.
Run MongoDB with docker-compose #
As you have seen running MongoDB with a regular Docker command is not an easy task and you need to remember all the parameters. A much easier and comparatively more declarative way is to use a docker-compose file like the one below:
version: '3.8'
services:
  mongodb:
    image: mongo:6-jammy
    ports:
      - '27017:27017'
    volumes:
      - dbdata6:/data/db
volumes:
  dbdata6:
It is a simple docker-compose file that uses the official MongoDB image with the tag 6-jammy. It runs it as mongodb and uses a docker-managed volume so that the data for the database is kept intact even if the container restarts. Here you also map the port 27012 to the host’s port 27017.
You can run the MongoDB server with docker-compose -f docker-compose-mongo-only.yml up given you save the above file as docker-compose-mongo-only.yml. To execute the Mongo shell on the container that is run with docker-compose you can run docker-compose exec mongodb mongosh and then run the above commands to see how it works. In the next section, you will learn how to run MongoDB with docker-compose which is accessed by another Node.js application.
Running MongoDB using docker-compose with a Node.js app #
For the next example, you will run MongoDB with Docker compose. MongoDB will be accessible to an example application built with Node.js and Express. This example application is an API to do CRUD operations for Tutorials. The code for this API is open source on GitHub and you can follow this tutorial to know how this demo REST API app is built.
You will dockerize the Node.js part of the application with the following dockerfile at the root of the project:
FROM node:18-alpine

WORKDIR /src
COPY package.json package-lock.json /src/
RUN npm install --production

COPY . /src

EXPOSE 8085

CMD ["node", "server.js"]
You can learn more about how to use Node.js with Docker to understand the concept better. Next, you will add a docker-compose.yml file at the root of the project to link up the Node.js container with the MongoDB container that will look as follows:
version: '3.8'

services:
  node-app:
    build: .
    image: node-app
    environment:
      - MONGODB_URL=mongodb://mongodb:27017/node-boilerplate
    ports:
      - '8085:8085'
    depends_on:
      - mongodb
    volumes:
      - .:/src
    networks:
      - node-network

  mongodb:
    image: mongo:6-jammy
    ports:
      - '27017:27017'
    volumes:
      - dbdata6:/data/db
    networks:
      - node-network

volumes:
  dbdata6:

networks:
  node-network:
    driver: bridge
Let’s have a look at the contents of this docker-compose file:
- First, you specify the version of docker-compose as
3.8 - After that you define two
serviceswhich arenode-appandmongodb - For the
node-appcontainer you build it with.which will take the above Dockerfile to build the image and run it. You also add theMONGODB_URLenvironment variable which points to the MongoDB container defined later in the same file. - Then you map the ports of the application from the Docker container port of
8085to the host port of8085as the Node.js Express application runs on that port. - Consequently you define that the
node-appcontainer depends on themongodbcontainer, there are better ways to make the dependency blocking but this is a basic way. - After that, you map the local folder
./to the./srcinside the container as a volume so that changes made from the host reflect in the container file system. - Then link up the app with the
node-network, this is how the two containers of the app and the MongoDB database can communicate with each other as they belong to the same network. - Subsequently you define the mongodb service similar to the above docker-compose file, the only extra thing here is the inclusion of the network. The volumes are the same as the above docker-compose file.
- Finally the network called
node-networkis defined as abridgedriver between the containers in the network.
All the code for this app and the dockerzing process is available in this GitHub repository, for your reference. Now, you can run the app and MongoDB in tandem with:
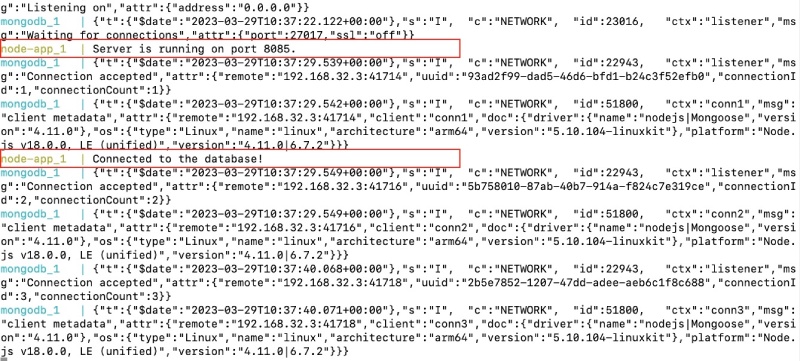
docker-compose upYou will see the following output where the MongoDB has started successfully and the app has connected to MongoDB too:

To add a tutorial you can run the following cURL command:
curl --location --request POST 'http://localhost:8085/api/tutorials' --header 'Content-Type: application/json' --data-raw '{ "title": "How to run MongoDB with docker and docker-compose; a step-by-step guide", "description": "You must read this post :)"}'If ran successfully it will give an output like the below:

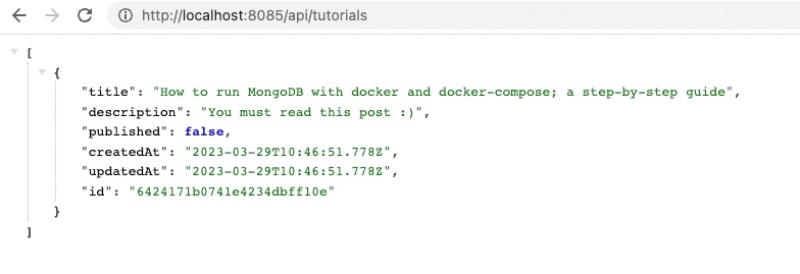
Now you can open the browser of your choice and hit http://localhost:8085/api/tutorials and you can see the following output:

Congratulations! You have now successfully connected MongoDB running with Docker compose to a Node.js Express API that can show and manage tutorials.
Conclusion #
In this post, you first learned about what is MongoDB and why to use it. Then you learned how to run Mongo DB with Docker run commands. Then you upped the complexity a bit by running the same 6-jammy version of MongoDB with Docker compose. Then towards the end, you could connect and Node.js Express app with MongoDB all using Docker Compose.
I hope you learned how to run MongoDB with Docker and Docker Compose, kudos!
