Next.js is a popular and opinionated React based meta-framework with a tagline of “Production grade React applications that scale”. Using Next.js with Docker has multiple advantages. This tutorial will walk you through setting up and running a Next.js project with Docker and Docker Compose, let's get started!
Table of contents #
- What is Next.js
- Next.js popularity
- Why use next.js with Docker
- Prerequisites
- Install Next.js without Docker
- Docker image for Next.js
- Adding Docker compose for Next.js
- Run Next.js with docker compose
- Conclusion
What is Next.js #
Before going further. let’s analyze why you need Next.js as a meta-framework on top of React. The debate is that React is just a library for building UI and not a framework. There are multiple ways and other libraries to do things in React (same as JavaScript). For instance, there are at least 6 libraries to do state management in React.
This is where Next.js and its opinionated decisions shine. Next.js brands itself as “The React Framework for Production” and it is open source, of course. Created by Vercel, Next.js is reportedly used by Nike, Realtor, Door Dash, and TypeForm to name some. Some features of Next.js include hybrid static and server rendering, TypeScript support, and smart bundling.
The main feature and reason for Next.js I believe is that it is React++. By that I mean,
Next.js helps you get over the decision fatigue that comes with React (and JavaScript in general) as it makes those decisions for you to a great extent following the “best practices”.
Don’t forget though, Next.js is a layer on top of React.js. It is the “framework” layer. For one project we worked with in 2020, the need was to do Server side rendering, and React did not do it out of the box. This is a use case to use Next.js. Unfortunately, we went with another solution but looking at hindsight Next.js would have been the best option then.
Next.js popularity #
Next.js is the most popular React meta-framework out there. As per NPM trends, it was downloaded 4.23 million times toward the end of Oct-2022. React is downloaded a lot more than Gatsby, Nuxt, Razzle, and Remix combined which are some of its competitors. As the picture speaks:
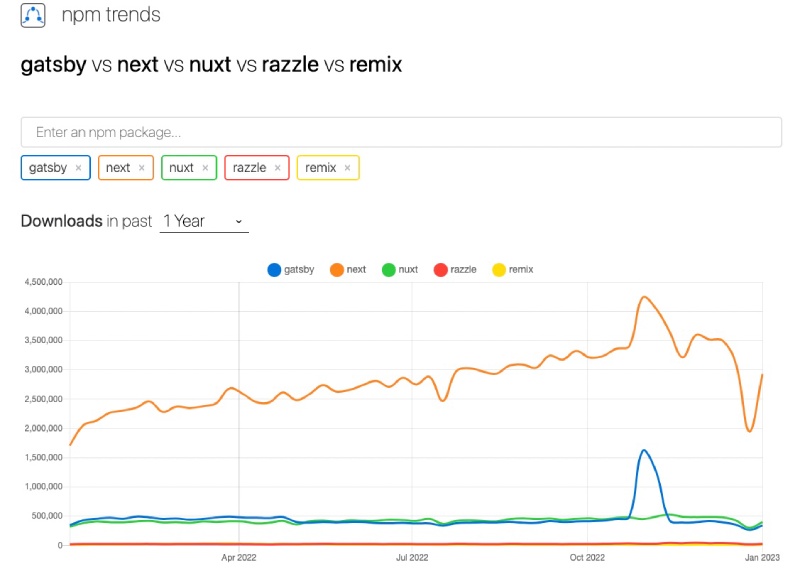
If it was a popularity contest, Next.js blows the other competitor out of the water. Being backed by Vercel it is also easy to host a Next.js application on Vercel. In the next section, you will learn why to use Next.js with Docker.
Why use next.js with Docker #
Similar to Dockerizing other applications, when you put the Next.js application on a docker container it has some advantages. There first one is that you ship the whole stack not only your code, the stack includes the OS, any other language/executables in specific versions and your code. This means you get over works on my machine syndrome.
In addition to making it portable, Docker also helps to run multiple copies of your application that can be scaled horizontally. As spinning up a docker container is relatively easy and cheap this helps with scaling your applications much easier with a container orchestrator like Kubernetes. All of these benefits surely apply to your Next.js app.
As Next.js also supports on server side rendering and API routes, the applications using these features cannot be cached on the CDN. This is where if the Next.js app is Dockerized it can be easily deployed into a Kubernetes cluster or even on serverless containers.
Prerequisites #
Before you jump into the code, below are some requisites:
- You should have Node.js installed on your system preferably the latest LTS which is Node.js v 18 at the time of writing. Similarly, some knowledge of npm and npx will also be needed.
- Have Docker installed and docker-compose installed on your machine
- Any prior experience with Next.js is beneficial but not necessary.
In the next section, you will install Next.js without Docker and then Dockerize it.
Install Next.js without Docker #
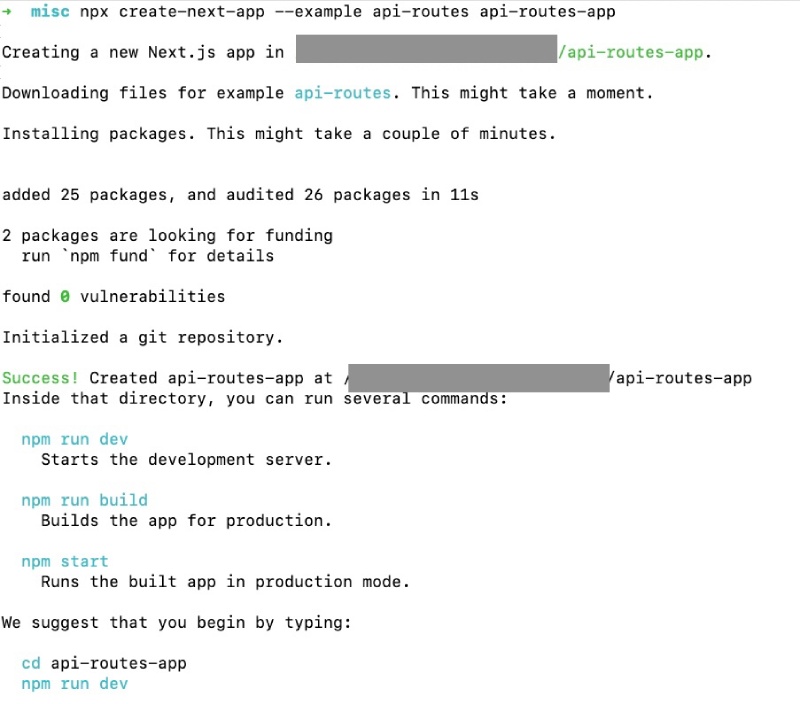
For this tutorial, you will use the API Routes example from the official Next.js examples. You can install this example by running:
npx create-next-app --example api-routes api-routes-appIt will show an output like the one below:
To test out if the example is working properly you can execute:
cd api-routes-app
npm run dev
It will run the server and now you can access the app at http://locahost:3000 which will look like the following:

You can click the names and play around. In the next section, you will Dockerize this example Next.js app which has APIs for the people.
Docker image for Next.js #
To Dockerize the above app, you will add the following Dockerfile on the root of the project:
FROM node:18-alpine AS deps
RUN apk add --no-cache libc6-compat
WORKDIR /app

COPY package.json package-lock.json ./
RUN  npm install --production

FROM node:18-alpine AS builder
WORKDIR /app
COPY --from=deps /app/node_modules ./node_modules
COPY . .

ENV NEXT_TELEMETRY_DISABLED 1

RUN npm run build

FROM node:18-alpine AS runner
WORKDIR /app

ENV NODE_ENV production
ENV NEXT_TELEMETRY_DISABLED 1

RUN addgroup --system --gid 1001 nodejs
RUN adduser --system --uid 1001 nextjs

COPY --from=builder --chown=nextjs:nodejs /app/.next ./.next
COPY --from=builder /app/node_modules ./node_modules
COPY --from=builder /app/package.json ./package.json

USER nextjs

EXPOSE 3000

ENV PORT 3000

CMD ["npm", "start"]
This is a multi-stage Dockerfile which starts with a deps stage. In this first stage which begins from the Node.js Alpine image. Then it adds lib6-comat package needed to build Next.js. As the stage is called deps for dependencies, in this stage the npm modules are installed next.
After that, you add the builder stage where the node modules are copied and the npm run build command is executed to build the Next.js project. You are also disabling the Next.js telemetry, this speed up the build a bit.
After that, you define the runner stage. This is the main stage that runs Next.js. Here you use the Node.js 18 Alpine image similar to all the above stages. Then add a group and user for Next.js. It is also important for security. After that, you copy the next folder from the builder stage, and node modules and package.json file. Then you define the user to be nextjs that will execute the command to run the Next.js project. In the end, you run npm start which will start the container with that command.
You can host your Next.js app with free Node.js hosting providers like Vercel. In the next part you will learn about adding Docker Compose to the Next.js app.
Adding Docker compose for Next.js #
You can run Next.js with just the above Docker file but it will be a long command. To keep things simple you will introduce a new docker-compose.yml file with the following contents at the root of the project:
version: '3.8'
services:
  web:
    build:
      context: ./
      target: runner
    volumes:
      - .:/app
    command: npm run dev
    ports:
      - "3000:3000"
    environment:
      NODE_ENV: development
Here you define a service called web and the stage/target to be runner. You link up the local directory to /app on the container, this will help with hot reload on local development as the files will be overwritten locally on each save.
Then you override the command to be npm run dev and link up local port 3000 to container port 3000. Finally, you define the NODE_ENV to be development.
The most important detail you should remember here is, the above Docker file is production ready and Docker compose in this case is designed to be used for development only.
Run Next.js with docker compose #
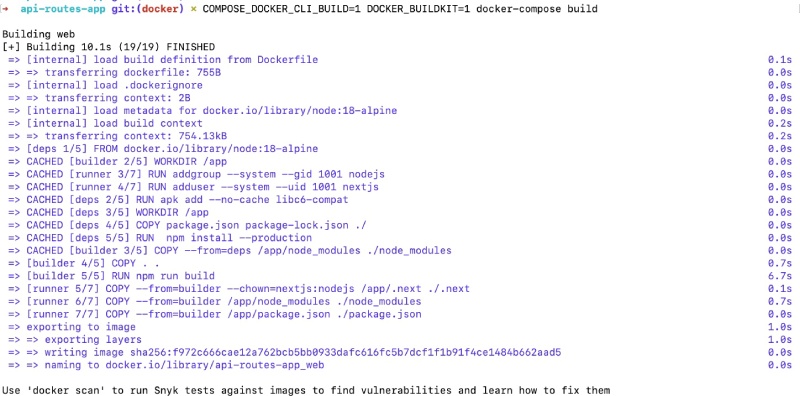
To run the Next.js project with docker-compose you will build the docker image and then run the container. To do this you will run:
COMPOSE_DOCKER_CLI_BUILD=1 DOCKER_BUILDKIT=1 docker-compose buildYou are instructing docker to use Buildkit which will speed up the docker build process. The command if ran successfully will finish up as follows:
To run Next.js with Docker and docker-compose you can then run:
docker-compose upIt will show the same output as running the app without docker when you hit http://localhost:3000 on your favorite browser after docker-compose up runs without any error:

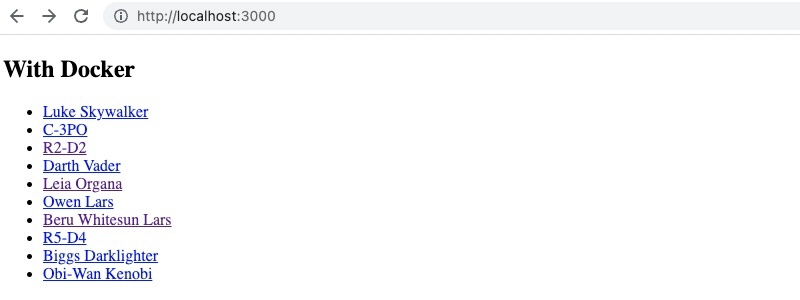
If change the pages/index.tsx to return the following at the end of the file:
return (
  <div>
    <h2>With Docker</h2>
    <ul>
      {data.map((p: Person) => (
      <PersonComponent key={p.id} person={p} />
      ))}
    </ul>
  </div>
)
The changes will be picked up pretty fast and show up on the browser as follows:
Congrats! You have successfully Dockerized a Next.js project. As the app has been Dockerized you can run it on any service with or without Kubernetes. You can also try out PostgreSQL with Docker and Docker compose and connect it with you Next.js application.
Thank you for following along, you can find all the code of this tutorial in this GitHub repository. For the docker-specific code please refer to this pull request.
Conclusion #
In this step-by-step guide, you learned about Next.js and its popularity. Then you installed one of the Next.js examples with API routes and first ran it without Docker. After that, you added the Dockerile and the docker-compose file. With the two files added you then built the docker image and then ran it locally with docker-compose up.
I hope you have learned how to dockerize any Next.js app. Keep learning!
