Google’s NotebookLM is a hidden gem in the world of information processing. It is not just another chatbot; it is a personalized AI research assistant grounded in your own documents. If you have ever felt overwhelmed by the sheer amount of documentation, PDFs, or websites you need to read to get a job done, this tool is for you at no cost. In this post, you will learn how to use NotebookLM, explore every important NotebookLM feature, and walk through a real-life example of using it to land a Senior Software Engineer job. Let’s get started!
Table of Contents #
- Need for NotebookLM
- What is NotebookLM?
- Prerequisites
- NotebookLM features
- How to use NotebookLM - Real-life example of job search
- Conclusion
Need for NotebookLM #
We live in an era of information overload. As technologists or even just avid learners, we are constantly bombarded with documentation, white papers, long YouTube tutorials, and complex job descriptions. The problem isn't finding information; it's synthesizing it into something useful.
You might be used to pasting text into ChatGPT or Claude to get a summary. That works for small things. But what if you have a 50-page PDF, a link to a website, and a YouTube video, and you need answers based only on those sources without the AI hallucinating facts?
This is where NotebookLM shines. It uses a concept called Retrieval-Augmented Generation (RAG) to "ground" the AI in your specific sources. It’s like hiring a super-smart intern, handing them a stack of books, and saying, "Only answer questions based on these books."
In this guide, you will go deep into how to use NotebookLM to boost your productivity. We will look at its features and then apply them to an efficient scenario: preparing for a high-stakes job interview.
What is NotebookLM? #
NotebookLM is an AI-first notebook offered by Google. Unlike standard LLMs (Large Language Models) that rely on their vast, pre-trained knowledge of the internet (which can be outdated or inaccurate), NotebookLM relies on "Sources" that you upload or links you provide.
When you create a "Notebook", you upload documents (PDFs, text files, Google Docs, Slides), paste website URLs, or link YouTube videos. The AI then becomes an expert on those specific sources – not on the parts of the internet with a cut-off date. NotebookLM is built with the latest Gemini models.
The main benefit here is trust. When NotebookLM gives you an answer, it includes citations. You can click a citation to jump directly to the paragraph in your uploaded PDF where the information is located. For software engineers reading technical specs or API documentation, this accuracy is non-negotiable.
Prerequisites #
Before we dive into the features and examples, below are some prerequisites you should have:
- A Google Account: NotebookLM is a Google product, so you will need a standard Gmail account or a Workspace account to access it.
- Access to NotebookLM: You can access it at notebooklm.google.com. It is currently has a free version (at the time of writing).
- Source Material: To get the most out of this guide, have a PDF, a website URL, or a YouTube video link ready to experiment with.
- Basic understanding of GenAI: Knowing how to write a basic prompt (asking the AI to do something) will be helpful.
Given that is mentioned, you can proceed to explore the features.
NotebookLM features #
NotebookLM is packed with features to help you quickly understand complex information. It is not just about text summaries; it is about multimodal understanding.
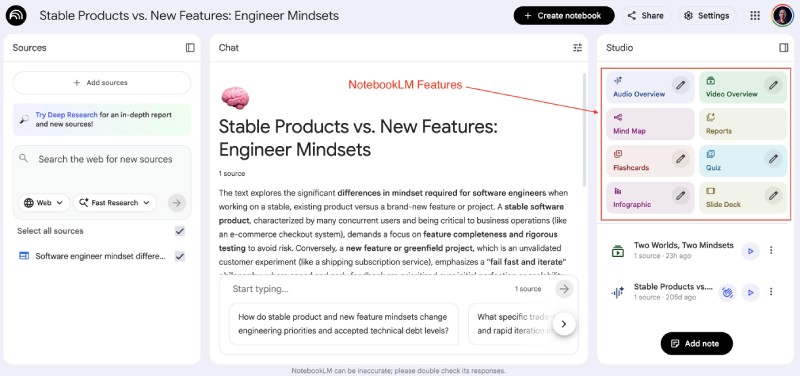
Let’s analyze every important NotebookLM feature you should be using. All the features mentioned below take a couple of minutes or more to be generated. It shows a loading icon on NotebookLM when the artifact is being generated.
Audio Overview - podcasts #
This is arguably the most viral and impressive NotebookLM feature. The Audio Overview allows you to turn your static documents, text files, and slides into an engaging, two-way audio conversation. These are also called NotebookLM podcasts.
Imagine you have uploaded a dry, 30-page technical document on Kubernetes architecture. Reading it might put you to sleep. However, with one click, NotebookLM generates a "Deep Dive" audio discussion.
Two AI hosts (a male and a female voice) will discuss your content. They don't just read it out loud like a text-to-speech engine. They banter. They use analogies. They express surprise at interesting facts. They summarize the key points in a format that sounds like a “high-quality” tech podcast. Take the “high-quality” with a grain (spoon) of salt :).
Someone apparently listened to 200 of these (in November 2024 - a year back) and wrote a blog post about it with a YouTube video. She concluded they lack the genuine connection and authenticity required to compete with human conversations. I would leave the analysis up to you. Here is an audio overview for a blog post about Good software engineering is about finding a solution at the correct layer with boring technology.
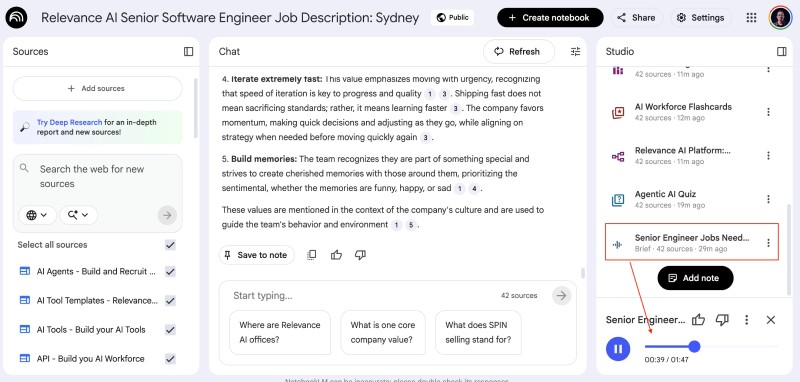
To use this, simply load your sources, go to the "Studio" section, and click "Audio Overview". it takes a few minutes, but the result is pretty realistic as seen below:
Next, you will learn about video overview.
Video Overview #
Notebook LM has recently added the video overview feature. Similar to an audio overview, it will create a video from the documents or links you provided in the source. Since last month, it has been using Nano banana to choose styles and create a brief video overview.
To create a default Video Overview after you add your source(s), you can click the Video Overview option in the Studio panel on the right side of the screen. Below is a 7-minute video I created based on my blog post Unblocking Software Engineers: Overcoming Non-technical and Technical Roadblocks:
The video is usually around 8 minutes, and the brief is around 2.5 minutes. It is an excellent feature if you want to digest information faster and you learn things better in a visual format. Suppose you click the “pen” beside the Video Overview. In that case, you can generate an “Explainer” or a “Brief,” choose the Language (50+ available, including Nepali), and select the visual style for the video. Give it a go.
Mind Map #
Visualizing data is crucial, while NotebookLM doesn't have a "Draw Mind Map" feature. You can use it to generate a mind map. To create a mind map from the uploaded sources, you can click the “Mind Map” on the Studio panel on the right side of the screen. It will generate a mindmap like the one below:

This converts your static text or PDFs into visual architecture diagram code, a massive time-saver. It really helps you understand complex concepts in a hierarchical mind map, as shown above.
Reports #
Reports are distilled information, taking a particular angle or type of writing generated by NotebookLM from the given set of sources. It can be in various formats like a Brefing Doc (with key insights and quotes from the source, Study Guide (short-answer quiz and glossary of key terms), Blog Post (insightful takeaways distilled into a highly readable format). Depending on the source, NotebookLM now has suggested formats for reports like Historical timeline, Concept Explainer, and others.
You can generate a “report” by clicking the Reports option in the Studio right side panel. It will show an overlay like the one below:
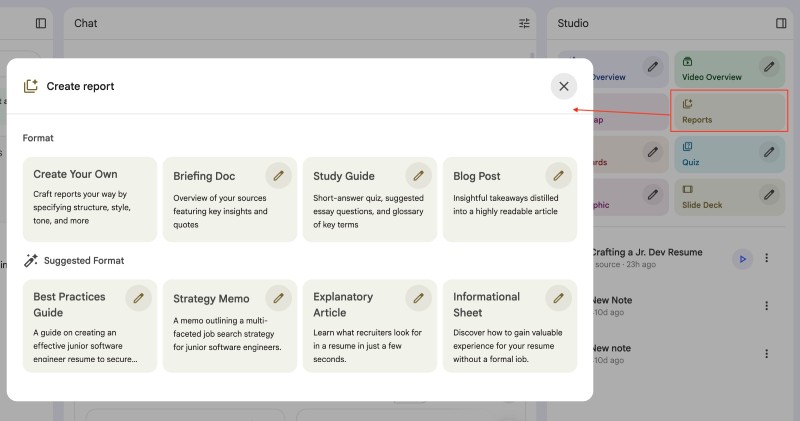
From there, you can click the given format or click the pen beside the format and edit the format to be generated. If you click the pen / edit button, you can choose the language and type in what you want the report to be about.
Flashcards #
Flashcards are like short questions and answers that are generated from the sources you upload to NotebookLM. You can generate them by clicking the FlashCards option on the Studio panel on the right side of the screen. You can customize the Number of cards and Level of Difficulty of questions, and click the pen icon to change the generation. Below is an example of the generated flash card:
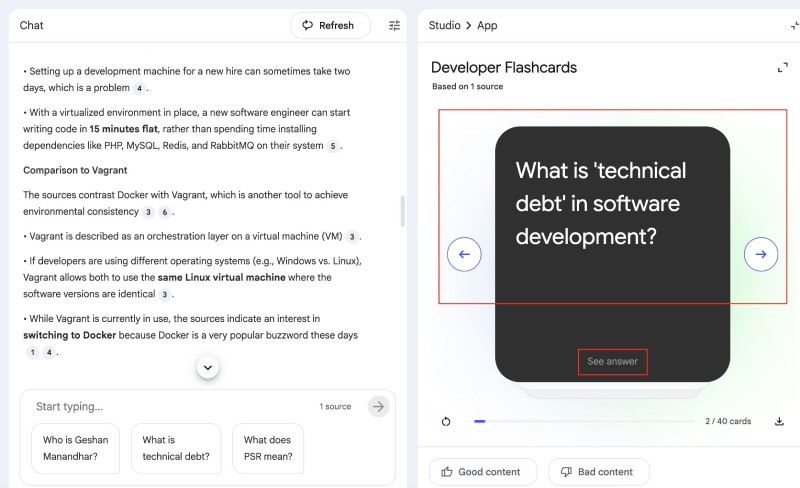
Flashcards can help you quickly learn the main points from the additional sources.
Quiz #
Similar to Flashcards, Quiz is another information representation format in NotebookLM. This feature will be handy as it will generate a quiz with 10 questions (usually) and answers from the given sources. You can generate a Quiz by clicking the Quiz option in the Studio panel on the right side of the NotebookLM user interface. Similar to the other features already mentioned, you can edit the type of the quiz by clicking the pen button. Below is a quiz generated for my blog post How Software Deployment tools have changed in the past 20 years using the default settings.
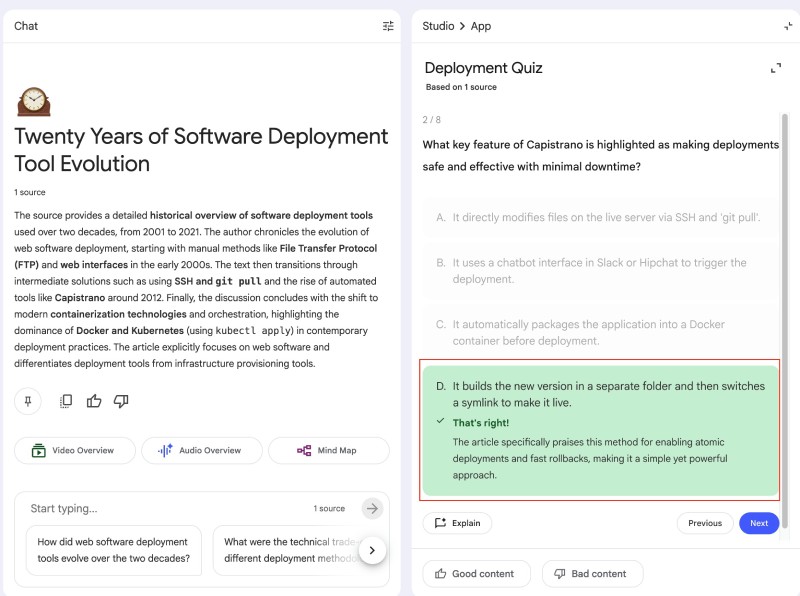
You can play the quiz too and refresh your knowledge on the software deployment tools of the past 20 years.
Infographic #
From the given sources of files, links, Google Docs, and YouTube videos, you can also generate an infographic on NoteBookLM. To create an infographic, you should click the Infographic option in the Studio section found on the right side of the page. Below is an infographic generated by Notebook LM for the 20 years of software deployment tools blog post:
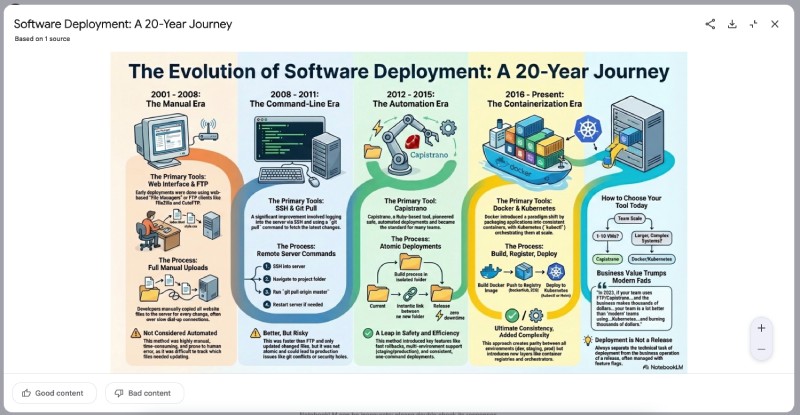
It can distill the information well. This feature was recently added to the free version of NotebookLM.
Slide Deck #
Similar to an infographic, you can also generate an “image” slide deck from the uploaded sources. You can also download the slide deck as a PDF and upload it to a slide rendering service like SlideShare or SpeakerDeck. In my experience, it usually generates 12-15 slides with images and explanations from the sources provided. You can develop the slides by clicking the Slide Deck option in the Studio panel on the right side of the NotebookLM user interface. The generated slides look as follows on the NotebookLM interface:
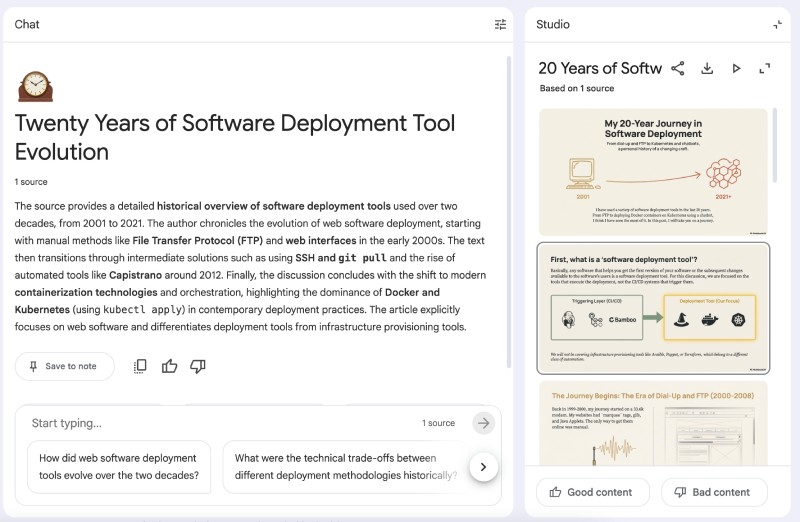
Below is an example of a generated slide deck for the 20 years of software deployment blog post:
In the next section, we will put all of this into practice with a concrete, real-life example.
How to use NotebookLM - Real-life example of job search #
Let’s say you are a backend software engineer looking for a new role. You have found a job opening at Relevance AI, a real company doing incredible things with AI agents, for a Senior Software Engineer role.
The job market is tough. To stand out, you cannot just send a generic resume. You need to understand the company deeply, understand the role, and prep for the specific interview questions they might ask.
Here is how you use NotebookLM to crush this process.
Add sources to NotebookLM #
To start a new Notebook, first go to NotebookLM and click the Create new notebook:
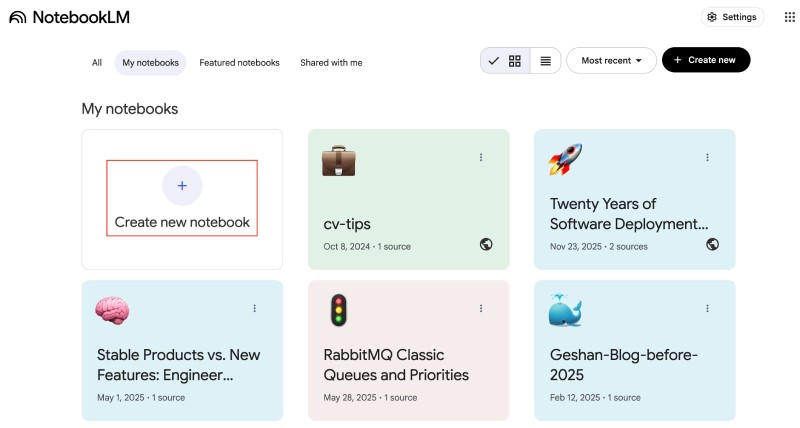
After creating an empty notebook, you can add sources. You will add the following sources:
- the job vacancy
- some pages from the Relevance AI website
- Relevance AI reviews from Glassdoor
To add the job vacancy page, you can save the job as a PDF file by going to https://jobs.ashbyhq.com/relevanceai/d5d5fc13-7415-454b-92d7-487cf187ba0a on Chrome and hitting Ctrl+P to print it and save the file as PDF. You can also access an archived version of the job vacancy. Sometimes NotebookLM doesn't extract the contents of a URL, especially if the page is loaded with JavaScript, so saving the page as a PDF file is better.
After you have the file, click on the choose file option below the Upload sources section in the newly created NotebookLM notebook as follows:
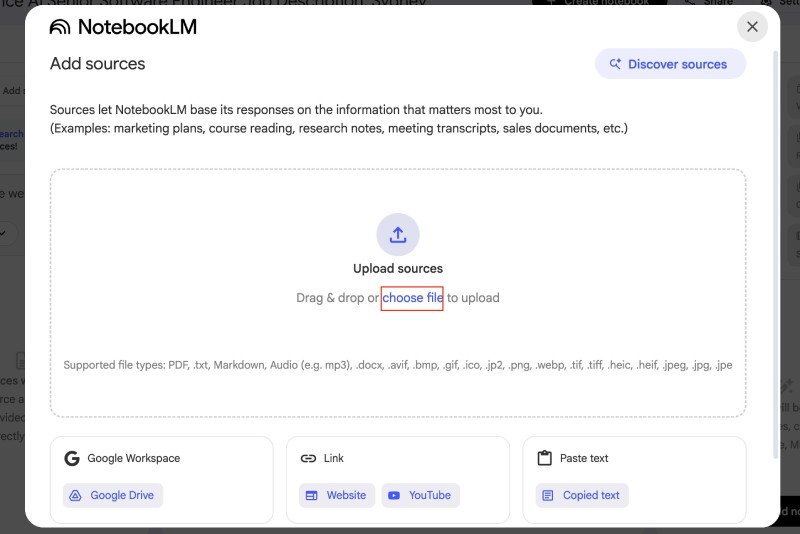
After the file is uploaded and processed, you will see a screen like the one below:
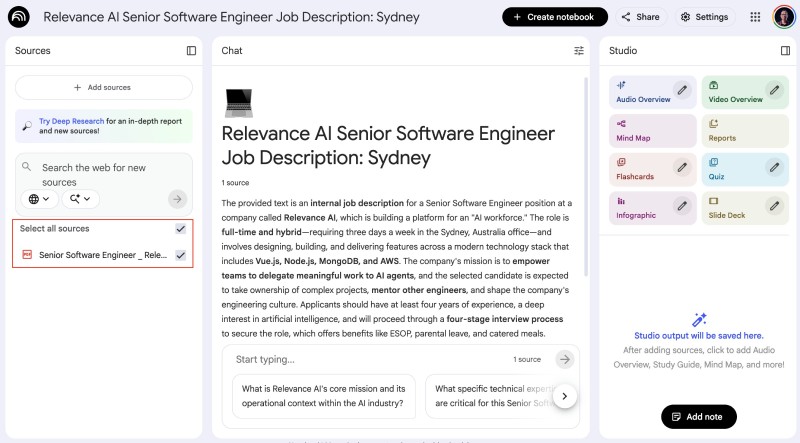
It has the vacancy as a PDF uploaded as a source, and in the Chat section in the middle, it also includes a summary of the Senior Software Engineer vacancy. Before you use any of the things in the right panel – Studio, upload more sources.
Next, you can go to the company’s website, which is relevanceai.com for this case, and run the following script to get all the links on that page:
urls = $$('a');
links = [];
for (url in urls) {
  const href = urls[url].href;
  if (href.startsWith('https://relevanceai.com') && !href.includes('#') && !links.includes(href)) {
    links.push(href);
  }
}
console.log(links);
console.log(links.join(" "));
Open the console on Google Chrome and run the above JavaScript snippet as follows:

It will log all the links on that page (61 in my case), since NotebookLM (free version) only has a maximum of 50 sources, so I had to select the first 40. You can choose the ones that make more sense to you. It would be good to keep the careers page, though, These were the 40 links I selected and pasted on Paste URLs after clicking the Add sources -> Website under the Link section:
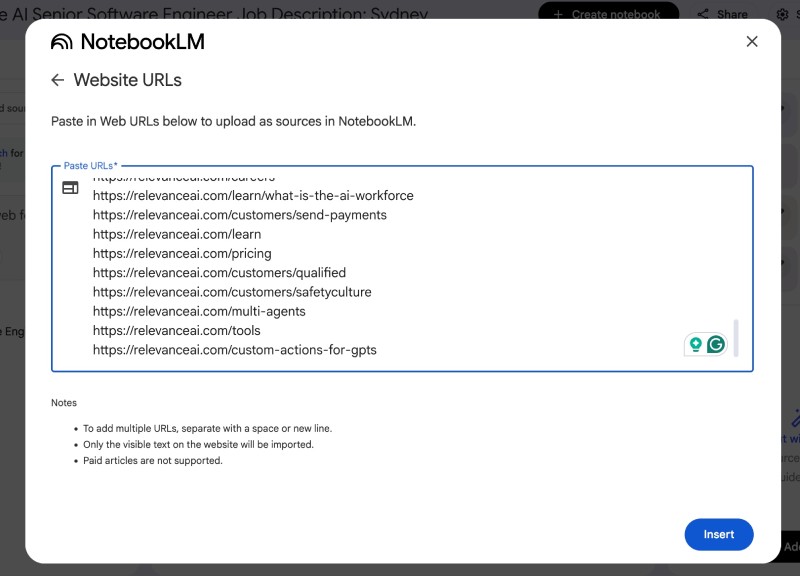
Then you can click Insert to add the 40 links to the Notebook. It will take a couple of seconds to pull in the contents of the 40 web pages, then it will look as follows:
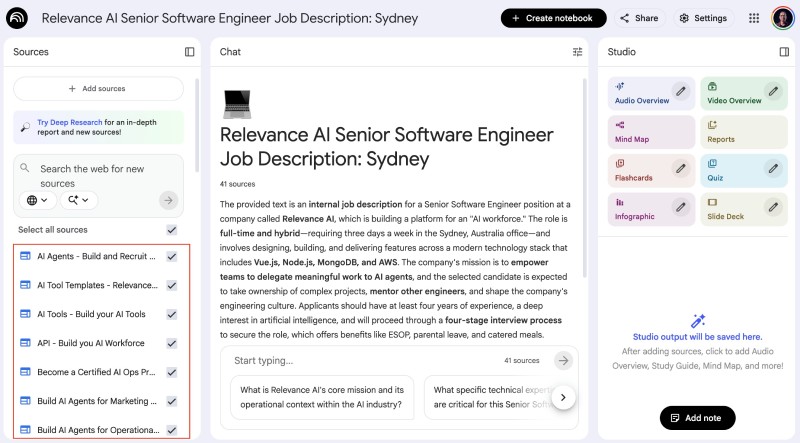
Now you can also add the Glassdoor review for Relevance AI, saved as a PDF. For that, go to the Glassdoor review page of Relevance AI, expand all the reviews by clicking the Show more link after every review, then only print the page as a PDF, and then upload the page. If there are multiple pages, you can use a free PDF joiner to join multiple PDFs into one.
To upload the PDF, click on + Add sources, then click choose file and select the PDF file you created from the Glassdoor page for Relevance AI. By now, you would have 42 sources, and if you want, you can add your resume too to ask questions to make it better, but we will not do that for this tutorial.
Ask questions about the company #
You can start asking questions, and NotebookLM will give you answers based on the 42 sources added (including the two PDF files). You can ask a question like:
- What tech stack is used, and what is mentioned, in the senior software engineer job vacancy?
Which will be answered by NotebookLM as follows:
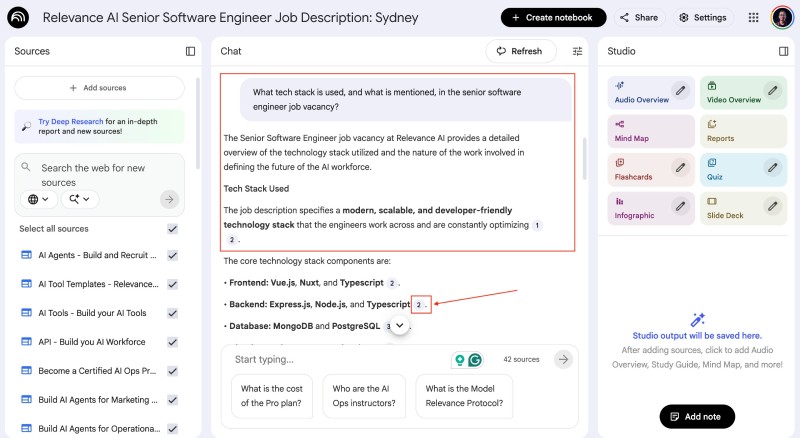
If you click on citation numbers like 2, it will take you to the source in the list of sources added. You can also hover over it to see the source’s text.
You can also ask other questions, like:
- Is Relevance AI profitable?
- How big is the tech team at Relevance AI?
- What are the values of the company? Could you list all of them?
You can get an idea of what you can ask the sources you added to the Notebook now. You can also add more sources, such as YouTube videos, to enrich your research, but be aware that the free version of NotebookLM has more limitations than the pro version. Read the plans page to get the exact details.
Explore more of the NotebookLM features #
In addition to asking questions about the source, you should explore the NotebookLM features discussed above. Let’s start with Audio Overview. You can tell NotebookLM to generate a Brief audio overview (podcast) and focus on the senior software engineer job vacancy:
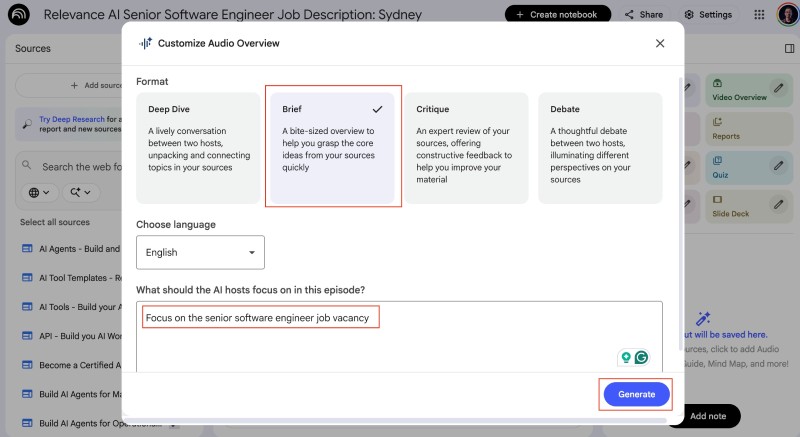
After you click Generate, it will take a couple of minutes, and you will get a 2-3 minute podcast focusing on the job vacancy. You can generate the audio overview in more than 50 languages. It will take a few minutes to be generated. When it is done, it will be listed below the eight options/features in the Studio panel on the bottom right side of the NotebookLM interface:
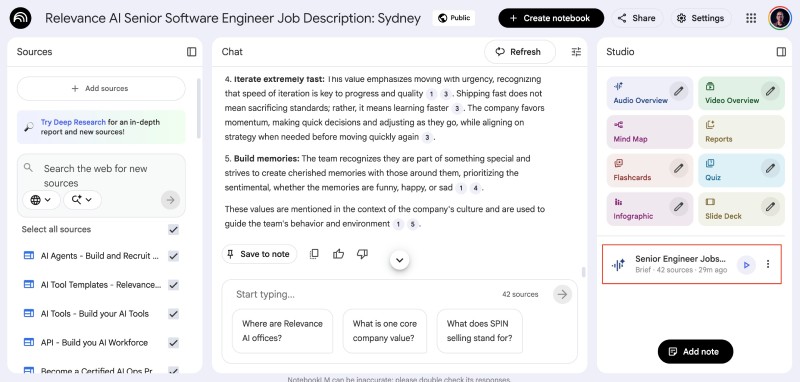
You can listen to it or even download it as a .mp3 file. You can use this online audio to video converter, put an image, and upload it to YouTube if you wish.
Similarly, you can generate a Quiz, play it, or even share it with your interviewer after the interview. A Mind Map will help you understand the company's domain in a hierarchical format, which is much easier to comprehend. You can also create a Video Overview to get a quick 5-8 minute video to understand what the company does and how it makes money, depending on the sources you have uploaded.
Try all eight tiles and see what they generate. I have set my Relevance AI Notebook to be publicly accessible if you want to see what it looks like.
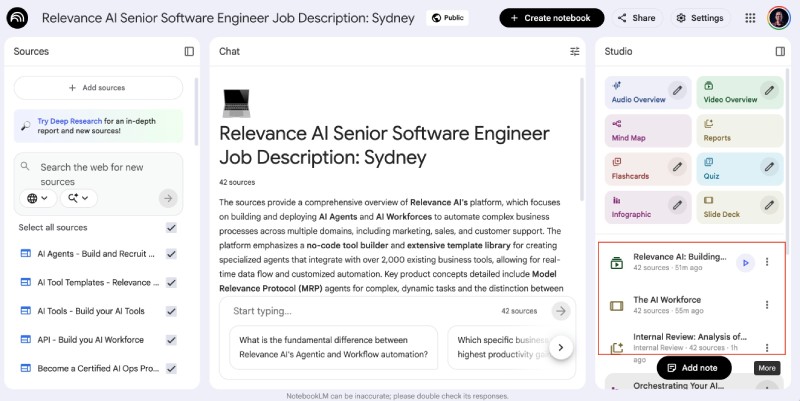
You can watch the video overview and listen to the audio overview too. You can also add your own notes and play around with NotebookLM. If you would like to use NotebookLM as a native mobile app you can download the Android app or the iOS app.
Conclusion #
NotebookLM is more than just a summarizer; it is a tool for synthesis and deep understanding with a generous free plan. By grounding the AI in your specific documents—whether that is a job description, technical documentation, or meeting notes—you eliminate the noise of the general internet and focus purely on what matters to you.
In this guide, you learned how to use NotebookLM features like Audio Overviews to learn while commuting, video overview, Mind Map, Reports, Flashcards, Quiz, Infographic, and Slide Deck. You also looked at a practical example of using NotebookLM as a research and thinking companion in a job search context.
Don't just read about it. Go to notebooklm.google.com, upload a PDF you have been meaning to read, and hit that "Audio overview" button or Video Overview. You will be surprised at how much more you learn. Keep learning!
