There are multiple ways to make HTTP requests in Node.js. We can do so using the standard HTTP/HTTPS module, of course, or we could use one of a number of npm packages that make our lives much easier.
In this post, we are going to see code examples of the native HTTPS module that comes built-in with your Node.js installation as well as npm packages like Axios, Got, SuperAgent, and node-fetch. Let’s get cracking!

Table of contents #
- Prerequisites
- The example we will use
- Client options for HTTP requests in Node.js
- A quick comparison of Node HTTP request methods
- Conclusion
Prerequisites #
Before we dive into the description and code, below are some prerequisites you’ll need to get your hands dirty with some Node.js code, which involves calling a remote mock JSON API:
- You should have Node.js running on your machine (maybe as a Docker container). All the examples will be run using Node.js 14.x, the active LTS
- You are familiar with npm commands like
npm init, and you are able to install npm packages withnpm install --save <module-name>to a project - You can run the JavaScript files with
node <filename>on your command line to see example output - You are familiar with callbacks, promises, and async/await
Basic things, but good to get them checked before proceeding any further :)
The example we will use #
We will make an example GET request with all the HTTP client options by calling data from the JSONPlaceholder mock API. It will send us back 10 users’ data. We will print out each user’s name and user ID.
All the code will be laid out as a separate pull request. You can see all the code examples collected in this open-source repository on GitHub. The first example is callback-based, the next two are promise-based, and the last two use async/await.
Client options for HTTP requests in Node.js #
We will walk through five options to make the GET HTTP call to the placeholder API. Node.js has built-in modules to perform many HTTP(S)-related actions, one of which is the ability to make HTTP calls. Let’s get started with the native HTTP(S) option that comes baked in with Node.js as our first example.
Standard Node.js HTTP(S) module #
Node.js comes with both HTTP and HTTPS modules in the standard library. For our example, as it is a HTTPS URL we will use the HTTPS module to perform the GET call. Below is the code example:
const https = require('https');

https.get('https://jsonplaceholder.typicode.com/users', res => {
  let data = [];
  const headerDate = res.headers && res.headers.date ? res.headers.date : 'no response date';
  console.log('Status Code:', res.statusCode);
  console.log('Date in Response header:', headerDate);

  res.on('data', chunk => {
    data.push(chunk);
  });

  res.on('end', () => {
    console.log('Response ended: ');
    const users = JSON.parse(Buffer.concat(data).toString());

    for(user of users) {
      console.log(`Got user with id: ${user.id}, name: ${user.name}`);
    }
  });
}).on('error', err => {
  console.log('Error: ', err.message);
});
Let’s walk through the code. First, we require the https standard Node module, which is available with Node.js installation. No need for a package.json file or any npm install --save to get this running.
We then call our JSONPlaceholder URL with the get method, which has a callback that provides the response we have put in the res variable.
Next, we initialize data as an empty array, and after that, we log the status code and date from the respone’s header. Subsequently, whenever we get data, we push the chunk to the data array.
Then, on the response end, we concat the array data, change it into a string, and parse the JSON to get the list of 10 users as an array of objects. Consequently, we loop through the 10 users and log the ID and name of the user object one at a time.
One thing to note here: if there is an error on the request, the error message is logged on the console. The above code is available as a pull request for your reference.
As HTTPS is a standard Node.js module, there’s been no need for a package.json — I wish I could say this for some of my Node.js projects.
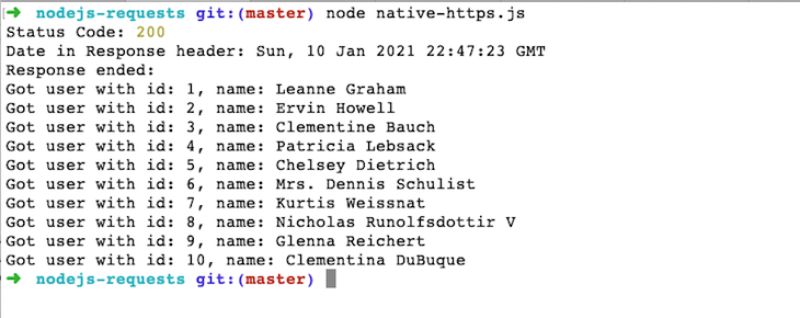
You can run the code simply with node native-https.js, provided you named the file native-https.js. It should show an output like below:

You can use the same method to run all the other examples in this post; they will show a similar output as we print status code, date from response header, and the user ID and name from the response body.
Next in line for exploration is the Axios npm package — for this, we will need a package.json file. Time to see how.
Axios #
Axios is a very popular promise-based request library. It is an HTTP client available for both browser and Node.js. It also includes handy features like intercepting request and response data, and the ability to automatically transform request and response data to JSON.
We can install Axios with the following command:
npm install --save axiosThen we can start using it. Let’s look at the example of calling our mock users JSON API with Axios:
const axios = require('axios');

axios.get('https://jsonplaceholder.typicode.com/users')
  .then(res => {
    const headerDate = res.headers && res.headers.date ? res.headers.date : 'no response date';
    console.log('Status Code:', res.status);
    console.log('Date in Response header:', headerDate);

    const users = res.data;

    for(user of users) {
      console.log(`Got user with id: ${user.id}, name: ${user.name}`);
    }
  })
  .catch(err => {
    console.log('Error: ', err.message);
  });
As you can see, there’s less code here than in the earlier example. It is promise-based as opposed to callback-oriented, so this code can be easily turned into async/await format if you wish.
Let’s explain what the code example is doing. First, we require the axios library, then we call the JSONPlaceholder users API with axios.get (which is promise-based).
We use the then method to get the result when the promise is resolved and get the response object as a res variable. In the then method, we log the status code and date from the response header.
We get the JSON data as an array easily with res.data thanks to Axios’ auto transformations. Consequently, we loop through the users, logging the ID and the name. In case of any error, we log the error message on the console. The code example is accessible as a pull request, too.
Next, we will take a look at another popular and feature-rich library, Got.
Got #
Got is another popular HTTP request library for Node.js. It claims to be a “human-friendly and powerful HTTP request library for Node.js.” It also features a promise-based API, and HTTP/2 support and its pagination API are Got’s USPs. Currently, Got is the most popular HTTP client library for Node.js, with over 19 million downloads per week.
We can install Got with the command below:
npm install --save gotBelow is a quick example of using Got to fetch the users from our mock API:
const got = require('got');

got.get('https://jsonplaceholder.typicode.com/users', {responseType: 'json'})
  .then(res => {
    const headerDate = res.headers && res.headers.date ? res.headers.date : 'no response date';
    console.log('Status Code:', res.statusCode);
    console.log('Date in Response header:', headerDate);

    const users = res.body;
    for(user of users) {
      console.log(`Got user with id: ${user.id}, name: ${user.name}`);
    }
  })
  .catch(err => {
    console.log('Error: ', err.message);
  });
This code example is pretty similar to Axios, but with two main differences:
- We needed to pass
{responseType: 'json'}as the second parameter to indicate that the response was in JSON format. - The status code header was called
statusCode, notstatus.
Other things remained basically the same as the previous request with Axios. The example can be seen in this pull request too.
Next up, we will have a look at Superagent.
SuperAgent #
SuperAgent by VisionMedia is one of the oldest Node.js request packages, released in April 2011. A robust HTTP library for Node.js, SuperAgent brands itself as a “small, progressive, client-side HTTP request library and Node.js module with the same API, supporting many high-level HTTP client features.” It offers both callback- and promise-based APIs. With a promise-based API, using async/await is just some syntactic sugar on top of it.
SuperAgent also features an array of plugins, ranging from no-cache to measuring HTTP timings.
We can install SuperAgent with the following command:
npm install --save superagentLet’s look at how our example users API call looks with SuperAgent. To provide some variety, we will use async/await for this illustration with an Immediately Invoked Function Expression (IIFE) compared to a promise-based example:
const superagent = require('superagent');

(async () => {
  try {
    const res = await superagent.get('https://jsonplaceholder.typicode.com/users');
    const headerDate = res.headers && res.headers.date ? res.headers.date : 'no response date';
    console.log('Status Code:', res.statusCode);
    console.log('Date in Response header:', headerDate);

    const users = res.body;
    for(user of users) {
      console.log(`Got user with id: ${user.id}, name: ${user.name}`);
    }
  } catch (err) {
    console.log(err.message); //can be console.error
  }
})();
Let’s further examine how we did the request with SuperAgent. We required the superagent library to make our test HTTP GET call. We started the IIFE with async because we want to use await, as mentioned in the next point.
Next, in the try block, we called superagent.get with await, which would resolve the promise and give us the result of the HTTP call to our mock users API. Then, from the res variable, we picked out the date from res.headers and logged status and date on the console.
After that, we set the response’s body in the users constant and looped through that array of 10 users to print out each user’s name and ID. Consequently, there is a catch block; if any error occurs anywhere in the try block, it will be caught, and the error message will be logged to the console.
SuperAgent is mature and battle-tested, which makes it pretty reliable. We can also test SuperAgent calls with SuperTest, which is a very handy library in its own right. Like the examples above, the SuperAgent code is available as a pull request.
Now let’s look at node-fetch.
node-fetch #
node-fetch is another hugely popular HTTP request library for Node.js — in the first week of December 2020, it was downloaded more than 20 million times, as per npm trends.
In their own words, “node-fetch is a lightweight module that brings the Fetch API (window.fetch) to Node.js.” Its features include consistency with the browser-based window.fetch and native promise and async functions.
We can install node-fetch with the command below:
npm install --save node-fetchNext, let’s have a look at how node-fetch can be used to call our mock users API. This example will also use async/await to keep things simple:
const fetch = require('node-fetch');

(async () => {
  try {
    const res = await fetch('https://jsonplaceholder.typicode.com/users');
    const headerDate = res.headers && res.headers.get('date') ? res.headers.get('date') : 'no response date';
    console.log('Status Code:', res.status);
    console.log('Date in Response header:', headerDate);

    const users = await res.json();
    for(user of users) {
      console.log(`Got user with id: ${user.id}, name: ${user.name}`);
    }
  } catch (err) {
    console.log(err.message); //can be console.error
  }
})();
Let’s review some of the differences here compared to our example of using SuperAgent with async/await:
fetchdid not need an explicit GET method; the HTTP verb can be sent as amethodkey in the second parameter, which is an object. For instance:{method: 'GET'}- Another difference is that the header is an object with a
getmethod to get header values. We calledres.headers.get('date')to get the value of the date response header - The final difference was the need to unwrap a promise to get the body as JSON with
await res.json(). It seemed like a bit of extra work, but that is how the browser Fetch API response works.
Same as all the above examples, this code is also accessible as a pull request for your reference.
Now it’s time to compare the four libraries that we just reviewed.
A quick comparison of Node HTTP request methods #
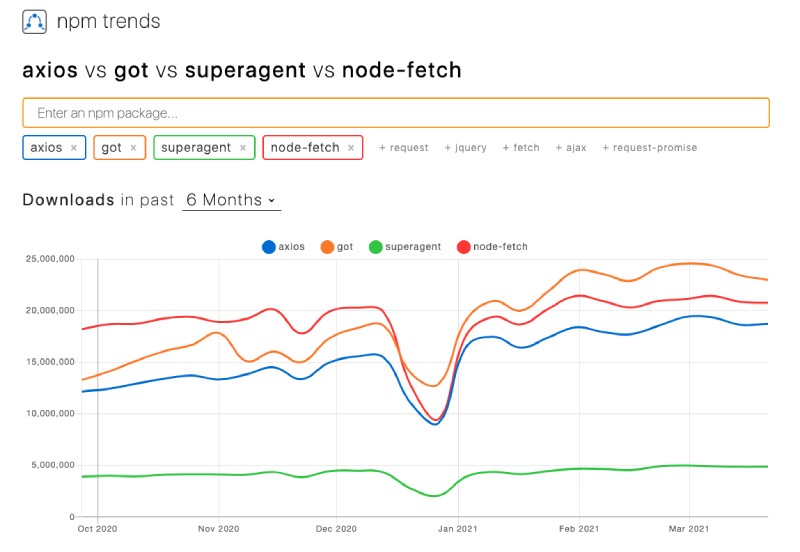
Except for the HTTP/HTTPS standard Node module, all four other HTTP client libraries for Node.js are available as npm packages. Below is a quick view of their download statistics by week for the past six months, via npm trends:

In terms of weekly downloads, got was the most popular, and SuperAgent was the least popular in the past six months. Let’s scrutinize some other metrics for a better picture of popularity among these contenders thanks to the comparison table on the Got GitHub repo:
| Axios | Got | Superagent | node-fetch | |
| GitHub stars | 80.55K | 8.81K | 15.49K | 5.92K |
| Install size | 388kB | 1.32MB | 1.70MB | 155kB |
| npm downloads (per week) | 18.76M | 22.96M | 4.87M | 20.74M |
From the above table, node-fetch is the most downloaded package. SuperAgent has the largest install size at 1.70MB, and Axios has the most GitHub stars with 80.55K — more than all three other libraries combined.
Conclusion #
I used SuperAgent quite extensively some years back; after that, I moved to Axios. With its long feature list, I want to give Got a try in the near future. Even though node-fetch looks promising and has a small install size, I am not sure if the API is user-friendly enough — at least for me.
You might notice I didn’t mention the Request npm package. Even though Request is still ultra-popular (22.36 million downloads each week), as of 11 February 2020, it will have been fully deprecated, so there’s no point in using a deprecated library.
All these libraries mainly do the same thing — much like which brand of coffee you prefer, in the end, you are still drinking coffee. Choose wisely depending on your use case, and make the right tradeoffs for maximum benefit.
